Source: securityboulevard.com – Author: Devesh Patel
Introduction: Why Your App Needs SCIM Yesterday
Picture this: Your B2B SaaS product has finally landed that enterprise client you’ve been courting for months. The contract is massive, and the champagne is on ice. Then comes the inevitable question from their IT department: “Does your platform support SCIM for user provisioning?”
Your heart sinks. Another deal potentially delayed—or worse, lost—because your application lacks enterprise-grade identity management capabilities.
You’re not alone. According to Gartner, over 68% of enterprise software purchases are now contingent on robust identity management integration capabilities, with SCIM rapidly becoming the expected standard. The painful reality is that without SCIM support, your application faces significant barriers to enterprise adoption:

- Enterprise clients refuse to manually manage thousands of user accounts
- Security teams reject applications without automated deprovisioning capabilities
- Compliance officers flag the lack of standardized identity governance
- Sales cycles stretch longer as custom identity solutions are negotiated
The good news? Implementing SCIM in your application isn’t as daunting as it might appear. This comprehensive guide will walk you through the entire process of building a production-ready SCIM API for your application, with detailed code examples, best practices, and implementation strategies that real developers have used successfully.
By the end of this guide, you’ll understand exactly how to implement SCIM support in your application, opening the door to enterprise customers and significantly reducing friction in your sales process.
Understanding SCIM Implementation Requirements
Before diving into code, let’s establish what a complete SCIM implementation entails for your application:
Core SCIM Requirements
To successfully implement SCIM, your application needs to:
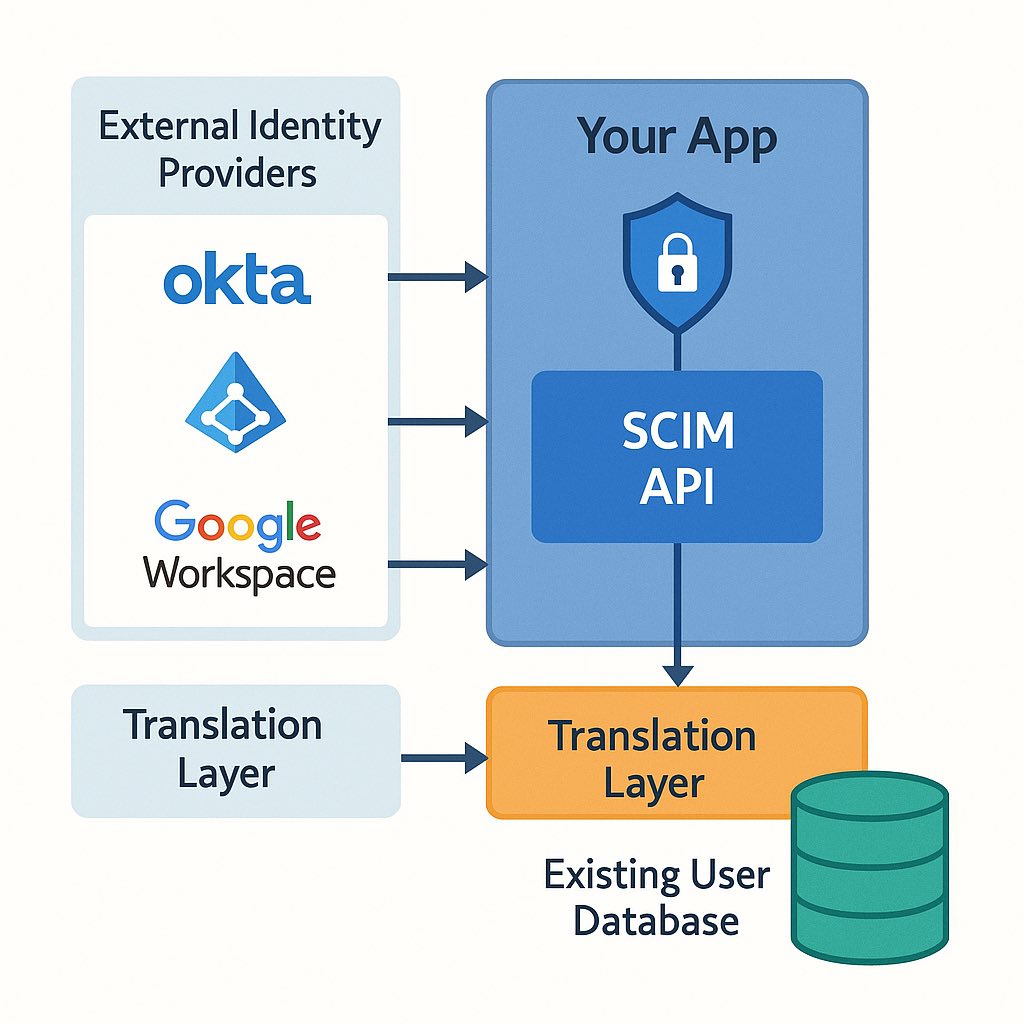
- Act as a SCIM Service Provider: Your application will receive and process SCIM requests from identity providers (IdPs) like Okta, Azure AD, or OneLogin.
- Support Core SCIM Resources: At minimum, implement the User resource and optionally the Group resource.
- Implement Standard SCIM Endpoints: Create RESTful API endpoints that handle SCIM operations (GET, POST, PUT, PATCH, DELETE).
- Follow the SCIM Schema: Structure your responses according to the SCIM schema specification (RFC 7643).
- Support Authentication: Typically implemented via OAuth 2.0 bearer tokens or API keys.
Prerequisites for SCIM Implementation
Before implementing SCIM, ensure your application has:
- Existing User Management: A functional user database and authentication system
- REST API Capabilities: Infrastructure for building and securing API endpoints
- JSON Handling: Ability to parse and generate JSON payloads conforming to the SCIM schema
- Authentication Mechanism: Preferably OAuth 2.0 or another secure token-based system
Step-by-Step Implementation Guide
Now, let’s walk through the process of implementing a SCIM API for your application:
Step 1: Design Your SCIM API Architecture
Before writing code, design how your SCIM implementation will connect to your existing user management system:
Option 1: Direct Integration Connect SCIM endpoints directly to your user database, translating between SCIM schema and your internal user representation.
Option 2: Adapter Pattern Create an adapter layer that translates between SCIM requests and your existing user management API calls.
Option 3: Parallel Identity Store Maintain a separate SCIM-compliant identity store that synchronizes with your main user database.
For most applications, Option 2 (Adapter Pattern) provides the best balance between integration effort and long-term maintainability.
Step 2: Set Up Your SCIM API Base Structure
Let’s start by setting up the base structure for your SCIM API. Here’s an example using Node.js with Express:
const express = require('express'); const bodyParser = require('body-parser'); const app = express(); const port = process.env.PORT || 8080; // Middleware app.use(bodyParser.json()); // Authentication middleware const authenticateRequest = (req, res, next) => { const authHeader = req.headers.authorization; if (!authHeader || !authHeader.startsWith('Bearer ')) { return res.status(401).json({ schemas: ["urn:ietf:params:scim:api:messages:2.0:Error"], detail: "Unauthorized", status: "401" }); } const token = authHeader.split(' ')[1]; // Verify the token against your authentication system // This is where you'd validate against your OAuth provider or token store if (!isValidToken(token)) { return res.status(401).json({ schemas: ["urn:ietf:params:scim:api:messages:2.0:Error"], detail: "Invalid token", status: "401" }); } next(); }; // SCIM API routes app.use('/scim/v2', authenticateRequest); // Define SCIM endpoints (we'll expand these below) app.get('/scim/v2/Users', (req, res) => { /* ... */ }); app.post('/scim/v2/Users', (req, res) => { /* ... */ }); app.get('/scim/v2/Users/:id', (req, res) => { /* ... */ }); app.put('/scim/v2/Users/:id', (req, res) => { /* ... */ }); app.patch('/scim/v2/Users/:id', (req, res) => { /* ... */ }); app.delete('/scim/v2/Users/:id', (req, res) => { /* ... */ }); // Group endpoints (if supported) app.get('/scim/v2/Groups', (req, res) => { /* ... */ }); app.post('/scim/v2/Groups', (req, res) => { /* ... */ }); app.get('/scim/v2/Groups/:id', (req, res) => { /* ... */ }); app.put('/scim/v2/Groups/:id', (req, res) => { /* ... */ }); app.patch('/scim/v2/Groups/:id', (req, res) => { /* ... */ }); app.delete('/scim/v2/Groups/:id', (req, res) => { /* ... */ }); // Service provider configuration app.get('/scim/v2/ServiceProviderConfig', (req, res) => { res.json({ schemas: ["urn:ietf:params:scim:schemas:core:2.0:ServiceProviderConfig"], documentationUri: "https://example.com/docs/scim", patch: { supported: true }, bulk: { supported: false, maxOperations: 0, maxPayloadSize: 0 }, filter: { supported: true, maxResults: 200 }, changePassword: { supported: false }, sort: { supported: false }, etag: { supported: false }, authenticationSchemes: [ { type: "oauth2", name: "OAuth 2.0", description: "OAuth 2.0 Bearer Token", specUri: "https://oauth.net/2/", documentationUri: "https://example.com/docs/auth" } ] }); }); app.listen(port, () => { console.log(`SCIM API server running on port ${port}`); }); // Helper function to validate tokens function isValidToken(token) { // Implement your token validation logic here return true; // Replace with actual validation } This basic structure sets up the required SCIM endpoints and a service provider configuration endpoint that describes your SCIM capabilities.
Step 3: Implement User Endpoints
Now, let’s implement the core User endpoints:
3.1: User Creation (POST /Users)
This endpoint handles user creation requests from the identity provider:
app.post('/scim/v2/Users', async (req, res) => { try { // Validate the request body against SCIM schema const validationResult = validateUserSchema(req.body); if (!validationResult.valid) { return res.status(400).json({ schemas: ["urn:ietf:params:scim:api:messages:2.0:Error"], detail: validationResult.error, status: "400" }); } // Extract core user attributes from the SCIM request const { userName, name, emails, active } = req.body; // Map SCIM attributes to your internal user model const newUser = { username: userName, firstName: name?.givenName || '', lastName: name?.familyName || '', email: emails?.find(e => e.primary)?.value || emails?.[0]?.value, active: active !== false, // Default to active if not specified // Map additional attributes as needed }; // Create the user in your system // This is where you'd call your existing user creation API or database const createdUser = await createUserInYourSystem(newUser); // Transform your internal user back to SCIM format const scimUser = transformToScimUser(createdUser); // Return the created user with 201 status res.status(201).json(scimUser); } catch (error) { console.error('Error creating user:', error); res.status(500).json({ schemas: ["urn:ietf:params:scim:api:messages:2.0:Error"], detail: "Internal server error", status: "500" }); } }); // Helper function to transform your user to SCIM format function transformToScimUser(user) { return { schemas: ["urn:ietf:params:scim:schemas:core:2.0:User"], id: user.id.toString(), userName: user.username, name: { givenName: user.firstName, familyName: user.lastName, formatted: `${user.firstName} ${user.lastName}` }, emails: [ { value: user.email, type: "work", primary: true } ], active: user.active, meta: { resourceType: "User", created: user.createdAt.toISOString(), lastModified: user.updatedAt.toISOString(), location: `https://example.com/scim/v2/Users/${user.id}` } }; } 3.2: Get User (GET /Users/:id)
This endpoint retrieves a single user by ID:
app.get('/scim/v2/Users/:id', async (req, res) => { try { const userId = req.params.id; // Retrieve the user from your system const user = await getUserById(userId); if (!user) { return res.status(404).json({ schemas: ["urn:ietf:params:scim:api:messages:2.0:Error"], detail: "User not found", status: "404" }); } // Transform to SCIM format and return const scimUser = transformToScimUser(user); res.json(scimUser); } catch (error) { console.error('Error retrieving user:', error); res.status(500).json({ schemas: ["urn:ietf:params:scim:api:messages:2.0:Error"], detail: "Internal server error", status: "500" }); } }); 3.3: List Users (GET /Users)
This endpoint lists users, potentially with filtering:
app.get('/scim/v2/Users', async (req, res) => { try { // Handle SCIM filtering const filter = req.query.filter; let queryParams = {}; if (filter) { // Parse the SCIM filter expression // This is a simplified example - full SCIM filtering is more complex if (filter.includes('userName eq')) { const username = filter.match(/userName eq "([^"]*)"https://securityboulevard.com/)?.[1]; if (username) queryParams.username = username; } if (filter.includes('emails.value eq')) { const email = filter.match(/emails.value eq "([^"]*)"https://securityboulevard.com/)?.[1]; if (email) queryParams.email = email; } // Handle active/inactive filtering if (filter.includes('active eq')) { const activeStr = filter.match(/active eq (true|false)/)?.[1]; if (activeStr) queryParams.active = activeStr === 'true'; } } // Apply pagination const startIndex = parseInt(req.query.startIndex) || 1; const count = parseInt(req.query.count) || 100; const offset = startIndex - 1; // Convert from 1-based to 0-based indexing // Get users from your system with the query parameters const { users, totalCount } = await listUsersFromYourSystem(queryParams, offset, count); // Transform to SCIM format const scimUsers = users.map(transformToScimUser); // Construct the SCIM ListResponse const response = { schemas: ["urn:ietf:params:scim:api:messages:2.0:ListResponse"], totalResults: totalCount, startIndex: startIndex, itemsPerPage: users.length, Resources: scimUsers }; res.json(response); } catch (error) { console.error('Error listing users:', error); res.status(500).json({ schemas: ["urn:ietf:params:scim:api:messages:2.0:Error"], detail: "Internal server error", status: "500" }); } }); 3.4: Update User (PUT /Users/:id)
This endpoint handles full user replacement:
app.put('/scim/v2/Users/:id', async (req, res) => { try { const userId = req.params.id; // Validate the request body const validationResult = validateUserSchema(req.body); if (!validationResult.valid) { return res.status(400).json({ schemas: ["urn:ietf:params:scim:api:messages:2.0:Error"], detail: validationResult.error, status: "400" }); } // Check if the user exists const existingUser = await getUserById(userId); if (!existingUser) { return res.status(404).json({ schemas: ["urn:ietf:params:scim:api:messages:2.0:Error"], detail: "User not found", status: "404" }); } // Extract and map SCIM attributes to your user model const { userName, name, emails, active } = req.body; const updatedUserData = { username: userName, firstName: name?.givenName || '', lastName: name?.familyName || '', email: emails?.find(e => e.primary)?.value || emails?.[0]?.value, active: active !== false, // Map additional attributes as needed }; // Update the user in your system const updatedUser = await updateUserInYourSystem(userId, updatedUserData); // Transform to SCIM format and return const scimUser = transformToScimUser(updatedUser); res.json(scimUser); } catch (error) { console.error('Error updating user:', error); res.status(500).json({ schemas: ["urn:ietf:params:scim:api:messages:2.0:Error"], detail: "Internal server error", status: "500" }); } }); 3.5: Modify User Attributes (PATCH /Users/:id)
This endpoint handles partial updates:
app.patch('/scim/v2/Users/:id', async (req, res) => { try { const userId = req.params.id; // Verify the user exists const existingUser = await getUserById(userId); if (!existingUser) { return res.status(404).json({ schemas: ["urn:ietf:params:scim:api:messages:2.0:Error"], detail: "User not found", status: "404" }); } // Validate PATCH operation format if (!req.body.Operations || !Array.isArray(req.body.Operations)) { return res.status(400).json({ schemas: ["urn:ietf:params:scim:api:messages:2.0:Error"], detail: "Invalid PATCH operation format", status: "400" }); } // Process each operation const updateData = {}; for (const operation of req.body.Operations) { const { op, path, value } = operation; if (op === 'replace') { // Handle different attribute replacements if (path === 'active') { updateData.active = value; } else if (path === 'userName') { updateData.username = value; } else if (path === 'name.givenName') { updateData.firstName = value; } else if (path === 'name.familyName') { updateData.lastName = value; } else if (path === 'emails[type eq "work"].value') { updateData.email = value; } // Handle other attribute paths as needed } // Implement 'add' and 'remove' operations as needed } // Apply the updates to your user const updatedUser = await updateUserInYourSystem(userId, updateData); // Transform to SCIM format and return const scimUser = transformToScimUser(updatedUser); res.json(scimUser); } catch (error) { console.error('Error patching user:', error); res.status(500).json({ schemas: ["urn:ietf:params:scim:api:messages:2.0:Error"], detail: "Internal server error", status: "500" }); } }); 3.6: Delete User (DELETE /Users/:id)
This endpoint handles user deletion or deactivation:
app.delete('/scim/v2/Users/:id', async (req, res) => { try { const userId = req.params.id; // Check if the user exists const existingUser = await getUserById(userId); if (!existingUser) { return res.status(404).json({ schemas: ["urn:ietf:params:scim:api:messages:2.0:Error"], detail: "User not found", status: "404" }); } // Option 1: Permanently delete the user await deleteUserFromYourSystem(userId); // Option 2: Alternatively, you could just deactivate the user // await updateUserInYourSystem(userId, { active: false }); // Return 204 No Content for successful deletion res.status(204).send(); } catch (error) { console.error('Error deleting user:', error); res.status(500).json({ schemas: ["urn:ietf:params:scim:api:messages:2.0:Error"], detail: "Internal server error", status: "500" }); } }); 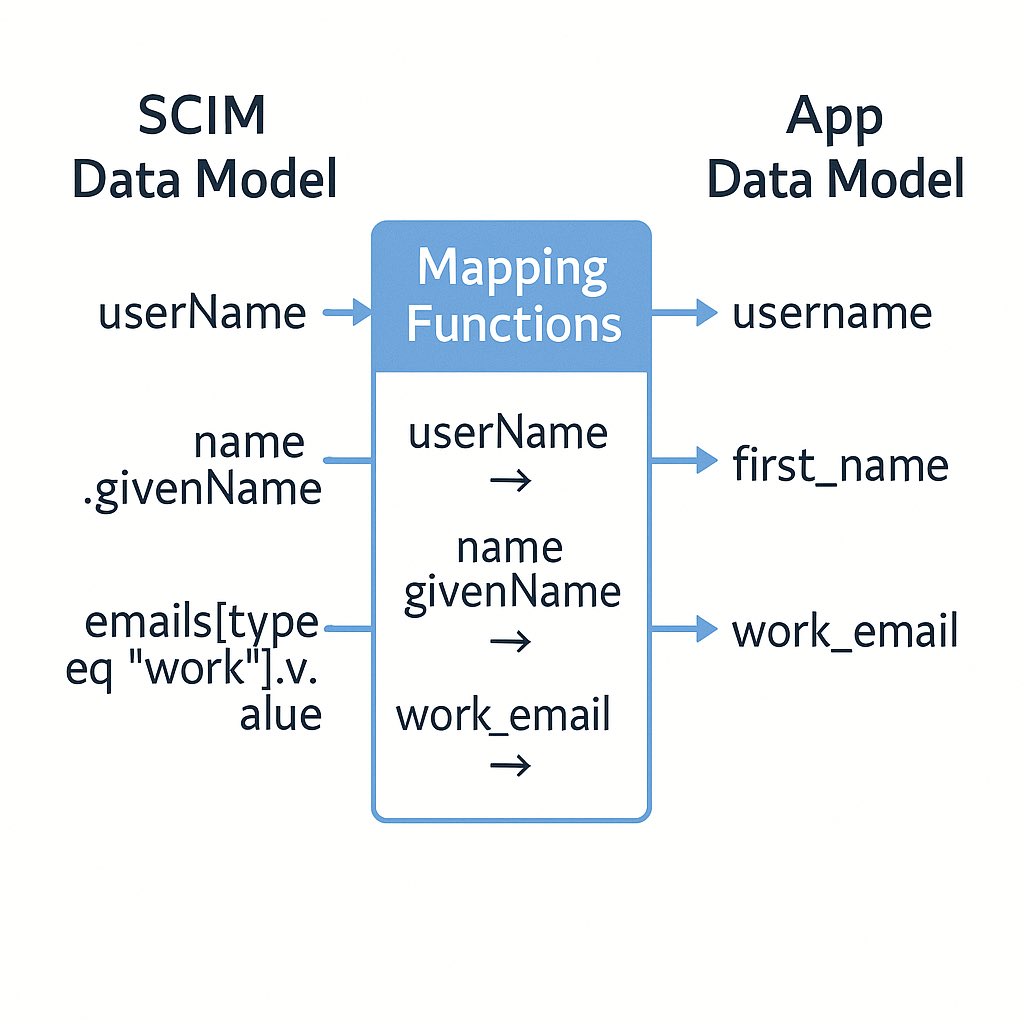
Step 4: Implement Group Endpoints (Optional)
If your application uses groups or roles, implementing Group endpoints provides additional value. Here’s an example of the Group creation endpoint:
app.post('/scim/v2/Groups', async (req, res) => { try { // Validate the request body if (!req.body.displayName) { return res.status(400).json({ schemas: ["urn:ietf:params:scim:api:messages:2.0:Error"], detail: "displayName is required", status: "400" }); } // Extract group details const { displayName, members } = req.body; // Map SCIM group to your internal group model const newGroup = { name: displayName, // Map additional attributes as needed }; // Create the group in your system const createdGroup = await createGroupInYourSystem(newGroup); // If members are specified, add them to the group if (members && Array.isArray(members)) { const memberIds = members.map(member => member.value); await addMembersToGroup(createdGroup.id, memberIds); } // Get the complete group with members const groupWithMembers = await getGroupWithMembers(createdGroup.id); // Transform to SCIM format const scimGroup = transformToScimGroup(groupWithMembers); // Return the created group res.status(201).json(scimGroup); } catch (error) { console.error('Error creating group:', error); res.status(500).json({ schemas: ["urn:ietf:params:scim:api:messages:2.0:Error"], detail: "Internal server error", status: "500" }); } }); // Helper function to transform your group to SCIM format function transformToScimGroup(group) { return { schemas: ["urn:ietf:params:scim:schemas:core:2.0:Group"], id: group.id.toString(), displayName: group.name, members: group.members.map(member => ({ value: member.id.toString(), $ref: `https://example.com/scim/v2/Users/${member.id}`, display: `${member.firstName} ${member.lastName}` })), meta: { resourceType: "Group", created: group.createdAt.toISOString(), lastModified: group.updatedAt.toISOString(), location: `https://example.com/scim/v2/Groups/${group.id}` } }; } Similar to the User endpoints, you’d implement GET, PUT, PATCH, and DELETE endpoints for Groups, handling group retrieval, updates, and deletion.
Step 5: Implement SCIM Filtering and Pagination
SCIM clients often use filtering to search for specific users or groups. Here’s how to implement more comprehensive filtering:
function parseScimFilter(filterString) { // This is a simplified parser for demonstration // A full implementation would handle complex expressions with AND, OR, etc. const queryParams = {}; // Parse username filter const usernameMatch = filterString.match(/userName eq "([^"]*)"https://securityboulevard.com/); if (usernameMatch) { queryParams.username = usernameMatch[1]; } // Parse email filter const emailMatch = filterString.match(/emails[type eq "work"].value eq "([^"]*)"https://securityboulevard.com/); if (emailMatch) { queryParams.email = emailMatch[1]; } // Parse active status const activeMatch = filterString.match(/active eq (true|false)/); if (activeMatch) { queryParams.active = activeMatch[1] === 'true'; } return queryParams; } This parsing function can be expanded to handle more complex SCIM filter expressions as needed.
Step 6: Support Enterprise User Extensions
Many enterprise IdPs use the Enterprise User extension for additional attributes:
// Enhanced transformation function with enterprise extension support function transformToScimUser(user) { const scimUser = { schemas: ["urn:ietf:params:scim:schemas:core:2.0:User"], id: user.id.toString(), userName: user.username, name: { givenName: user.firstName, familyName: user.lastName, formatted: `${user.firstName} ${user.lastName}` }, emails: [ { value: user.email, type: "work", primary: true } ], active: user.active, meta: { resourceType: "User", created: user.createdAt.toISOString(), lastModified: user.updatedAt.toISOString(), location: `https://example.com/scim/v2/Users/${user.id}` } }; // Add enterprise extension if relevant attributes exist if (user.employeeNumber || user.department || user.manager) { scimUser.schemas.push("urn:ietf:params:scim:schemas:extension:enterprise:2.0:User"); scimUser["urn:ietf:params:scim:schemas:extension:enterprise:2.0:User"] = {}; const enterpriseExt = scimUser["urn:ietf:params:scim:schemas:extension:enterprise:2.0:User"]; if (user.employeeNumber) { enterpriseExt.employeeNumber = user.employeeNumber; } if (user.department) { enterpriseExt.department = user.department; } if (user.costCenter) { enterpriseExt.costCenter = user.costCenter; } if (user.manager) { enterpriseExt.manager = { value: user.manager.id.toString(), $ref: `https://example.com/scim/v2/Users/${user.manager.id}`, displayName: `${user.manager.firstName} ${user.manager.lastName}` }; } } return scimUser; } 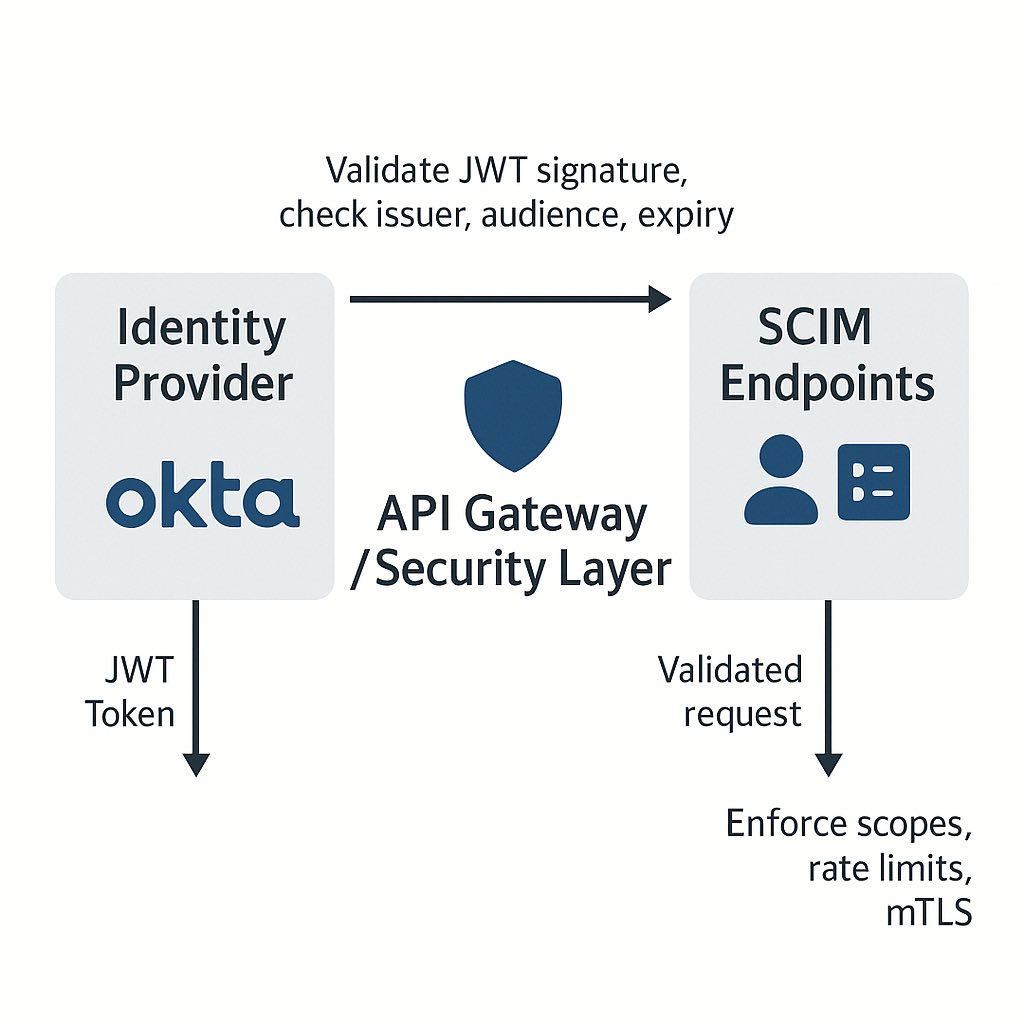
Best Practices for SCIM Implementation
As you implement SCIM in your application, follow these best practices:
Security Considerations
- Use TLS/HTTPS: Always use HTTPS for all SCIM endpoints to ensure data protection in transit.
- Implement Strong Authentication: OAuth 2.0 with Bearer tokens is recommended, but at minimum, use API keys with proper security controls.
- Apply Rate Limiting: Protect your SCIM API from abuse with appropriate rate limiting.
- Validate All Input: Thoroughly validate all incoming SCIM payloads to prevent injection attacks.
- Implement Proper Authorization: Ensure tokens have appropriate scopes and permissions for the requested operations.
Implementation Tips
- Start Small: Begin with core User operations before moving to Groups and advanced features.
- Use Middleware for Common Tasks: Implement middleware for authentication, error handling, and logging.
- Map Attributes Carefully: Pay special attention to mapping between SCIM attributes and your internal data model.
- Handle Errors Consistently: Use standard SCIM error formats for all error responses.
- Document Your SCIM API: Create clear documentation that explains your supported features and any limitations.
Testing Your SCIM API
- Create a Test Suite: Develop comprehensive tests for all SCIM endpoints.
- Test with Real IdPs: Test your implementation with major identity providers like Okta, Azure AD, and OneLogin.
- Verify Error Handling: Ensure your API handles malformed requests and edge cases gracefully.
- Check Performance: Test your API with bulk operations and large datasets to ensure performance.
Sample SCIM API Integration Configurations
Here are configuration examples for popular identity providers that your customers might use:
Okta Configuration Example
{ "name": "Your Application SCIM", "baseUrl": "https://your-app.com/scim/v2", "authorization": { "type": "OAUTH2", "tokenUrl": "https://your-app.com/oauth/token" }, "userManagement": { "supported": true, "createUsers": true, "updateUsers": true, "deleteUsers": true }, "groupPush": { "supported": true }, "mappings": { "user": { "userName": "userName", "firstName": "name.givenName", "lastName": "name.familyName", "email": "emails[type eq "work"].value", "active": "active" } } } Azure AD Configuration Example
{ "applicationId": "your-app-id", "objectId": "your-object-id", "displayName": "Your Application", "identifierUris": ["https://your-app.com"], "url": "https://your-app.com/scim/v2", "provisioningAttributes": [ { "name": "userPrincipalName", "mappedTo": "userName" }, { "name": "givenName", "mappedTo": "name.givenName" }, { "name": "surname", "mappedTo": "name.familyName" }, { "name": "mail", "mappedTo": "emails[type eq "work"].value" }, { "name": "accountEnabled", "mappedTo": "active" } ] } Advanced SCIM Features
Once you’ve implemented the core SCIM functionality, consider these advanced features:
Bulk Operations
Support for processing multiple operations in a single request:
app.post('/scim/v2/Bulk', async (req, res) => { try { if (!req.body.Operations || !Array.isArray(req.body.Operations)) { return res.status(400).json({ schemas: ["urn:ietf:params:scim:api:messages:2.0:Error"], detail: "Invalid bulk operation format", status: "400" }); } const operations = req.body.Operations; const results = []; let failureOccurred = false; // Process each operation for (const operation of operations) { try { const { method, path, bulkId, data } = operation; let result; // Handle different HTTP methods switch (method) { case 'POST': if (path === '/Users') { const user = await createUserInYourSystem(mapScimUserToInternalUser(data)); result = { method, bulkId, status: "201", location: `https://example.com/scim/v2/Users/${user.id}`, response: transformToScimUser(user) }; } else if (path === '/Groups') { const group = await createGroupInYourSystem(mapScimGroupToInternalGroup(data)); result = { method, bulkId, status: "201", location: `https://example.com/scim/v2/Groups/${group.id}`, response: transformToScimGroup(group) }; } break; case 'PUT': case 'PATCH': case 'DELETE': // Implement other methods as needed break; default: throw new Error(`Unsupported method: ${method}`); } results.push(result); } catch (opError) { failureOccurred = true; results.push({ method: operation.method, bulkId: operation.bulkId, status: "400", response: { schemas: ["urn:ietf:params:scim:api:messages:2.0:Error"], detail: opError.message, status: "400" } }); } } // Return the bulk response res.status(failureOccurred ? 207 : 200).json({ schemas: ["urn:ietf:params:scim:api:messages:2.0:BulkResponse"], Operations: results }); } catch (error) { console.error('Error processing bulk operation:', error); res.status(500).json({ schemas: ["urn:ietf:params:scim:api:messages:2.0:Error"], detail: "Internal server error", status: "500" }); } }); Custom Schemas
Supporting custom attributes for enterprise-specific needs:
// Example of transforming a user with custom attributes function transformToScimUserWithCustomAttributes(user) { const scimUser = transformToScimUser(user); // Add custom schema if custom attributes exist if (user.customAttributes) { scimUser.schemas.push("urn:scim:schemas:extension:yourapp:1.0:User"); scimUser["urn:scim:schemas:extension:yourapp:1.0:User"] = { approvalStatus: user.customAttributes.approvalStatus, accessLevel: user.customAttributes.accessLevel, regionCode: user.customAttributes.regionCode }; } return scimUser; } Debugging and Troubleshooting SCIM Implementation
When implementing SCIM, you’ll likely encounter challenges. Here are some common issues and solutions:
Common Issues and Solutions
- Attribute Mapping Discrepancies
- Problem: Users not provisioning correctly due to attribute mismatches
- Solution: Implement detailed logging that compares incoming SCIM payloads to your internal model mappings
- Authentication Failures
- Problem: IdPs cannot authenticate to your SCIM API
- Solution: Verify token validation logic and implement proper token debugging
- SCIM Filter Parsing Errors
- Problem: Complex SCIM filters not translating to your database queries
- Solution: Gradually build up filter support, starting with equality filters before adding more complex operations
- Bulk Operation Handling
- Problem: Bulk operations partially failing without proper error handling
- Solution: Implement transaction support or compensating actions for bulk operations
Debugging Tools
Implement comprehensive logging for your SCIM API:
// SCIM request logging middleware const scimRequestLogger = (req, res, next) => { const requestId = uuidv4(); // Log the request console.log(`[SCIM][${requestId}] ${req.method} ${req.originalUrl}`); if (['POST', 'PUT', 'PATCH'].includes(req.method)) { console.log(`[SCIM][${requestId}] Request Body:`, JSON.stringify(req.body)); } // Capture the original response methods const originalJson = res.json; const originalSend = res.send; // Override response methods to log responses res.json = function(body) { console.log(`[SCIM][${requestId}] Response:`, JSON.stringify(body)); return originalJson.call(this, body); }; res.send = function(body) { if (body) { console.log(`[SCIM][${requestId}] Response:`, body); } return originalSend.call(this, body); }; next(); }; // Add the logger middleware to SCIM routes app.use('/scim/v2', scimRequestLogger); Going to Production with Your SCIM API
Before launching your SCIM API to customers, take these steps:
1. Complete Documentation
Create detailed documentation explaining:
- How to configure your SCIM endpoint in popular IdPs
- Supported SCIM features and limitations
- Authentication requirements
- Attribute mappings and supported schemas
2. Security Review
Conduct a comprehensive security review:
- Penetration testing of the SCIM API
- Token handling and validation
- Rate limiting and DDoS protection
- Access control mechanisms
3. Monitoring and Alerting
Implement monitoring specific to your SCIM API:
- Alert on authentication failures
- Monitor provisioning errors
- Track usage patterns and performance metrics
- Set up logging for audit purposes
4. Customer Onboarding Process
Create a smooth customer onboarding process:
- Step-by-step configuration guides for major IdPs
- Testing checklist for customers
- Troubleshooting resources
- Support contact information
Conclusion: The Business Impact of SCIM Implementation
Implementing SCIM in your application isn’t just a technical achievement—it’s a strategic business advantage. Here’s why it matters:
Tangible Benefits
- Accelerated Enterprise Sales: Reduce friction in enterprise sales cycles by meeting identity management requirements upfront
- Reduced Support Costs: Eliminate manual user provisioning tasks and related support tickets
- Enhanced Security: Ensure users are promptly deprovisioned when they leave an organization
- Competitive Advantage: Differentiate your product from competitors lacking enterprise identity features
Enterprise Readiness
By implementing SCIM, you signal to enterprise customers that your application is ready for serious business use. You’re demonstrating:
- Security Focus: You understand enterprise security requirements
- Scalability: Your application can handle large user bases
- Integration Capability: Your product plays well with enterprise IT ecosystems
- Compliance Awareness: You recognize the importance of identity governance
The effort to implement SCIM is substantial, but the rewards are significant. You’re not just building an API—you’re opening the door to enterprise customers who might otherwise never consider your product.
By following this guide, you now have the blueprint for implementing a complete SCIM API in your application. As identity management continues to grow in importance, your SCIM implementation will serve as a critical component of your product’s enterprise strategy.
*** This is a Security Bloggers Network syndicated blog from SSOJet authored by Devesh Patel. Read the original post at: https://ssojet.com/blog/implementing-a-scim-api-for-your-application-a-comprehensive-guide/
Original Post URL: https://securityboulevard.com/2025/05/implementing-a-scim-api-for-your-application-a-comprehensive-guide/?utm_source=rss&utm_medium=rss&utm_campaign=implementing-a-scim-api-for-your-application-a-comprehensive-guide
Category & Tags: Identity & Access,Security Bloggers Network,Authentication,b2b,B2B SaaS,enterprise,Enterprise SSO,enterprise-ready,SAML,SCIM,single sign on,sso – Identity & Access,Security Bloggers Network,Authentication,b2b,B2B SaaS,enterprise,Enterprise SSO,enterprise-ready,SAML,SCIM,single sign on,sso
Views: 4