Source: securityboulevard.com – Author: Andy Robbins
Microsoft Breach — What Happened? What Should Azure Admins Do?
On January 25, 2024, Microsoft published a blog post that detailed their recent breach at the hands of “Midnight Blizzard”. In this blog post, I will explain the attack path “Midnight Blizzard” used and what Azure admins and defenders should do to protect themselves from similar attacks.
The Attack Path
Step 0: The adversary used password guessing to gain initial access into a “test” tenant.
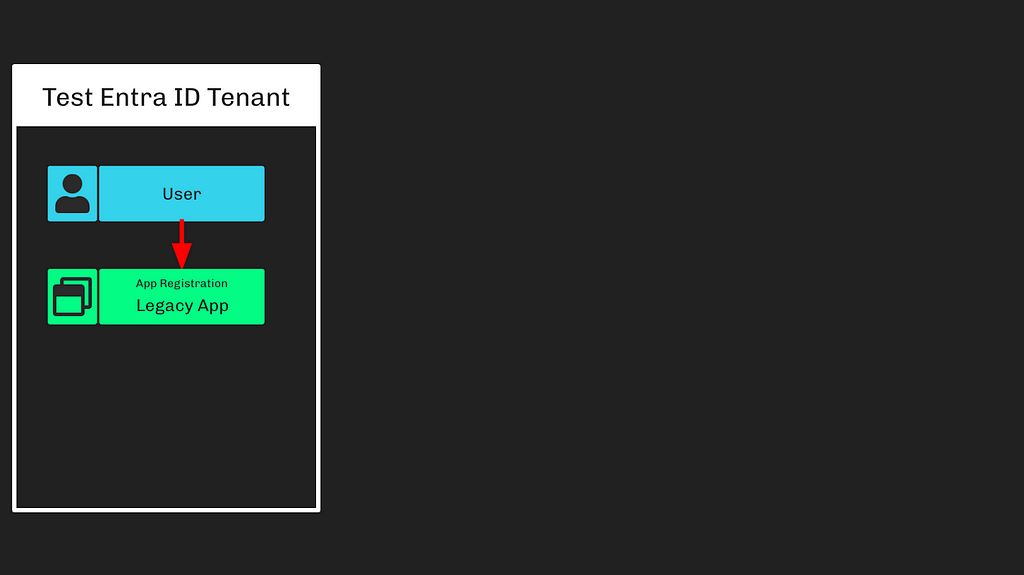
Step 1: The adversary used this access to “compromise” an app registration in the test tenant (Figure 1).
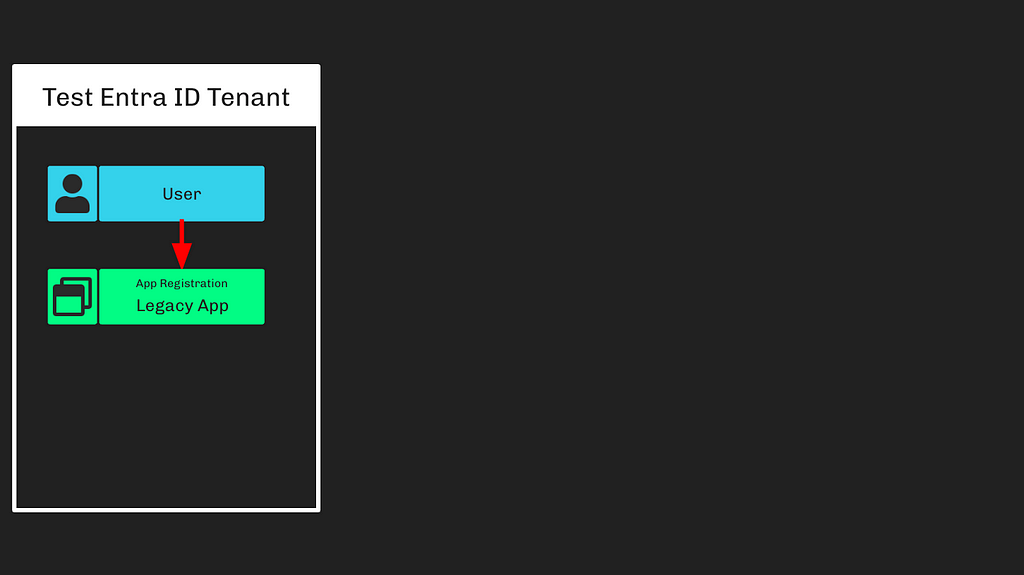
I interpret the word “compromise” here to mean the adversary added a new credential to the app registration object. We don’t know from Microsoft’s blog post how exactly this user was able to do this. These are the Entra ID roles that allow a user to add new credentials to any app within the tenant:
- Application Administrator
- Cloud Application Administrator
- Directory Synchronization Accounts
- Global Administrator
- Hybrid Identity Administrator
There may have also been a custom role, or the user was possibly added as an owner of the app registration. Conversely, the user may have potentially had one of the following roles, which allow escalation to any role including Global Administrator:
- Partner Tier2 Support
- Privileged Role Administrator
Step 2: The adversary rode existing configurations to gain “elevated access” into the Microsoft corporate Entra ID tenant (Figure 2).
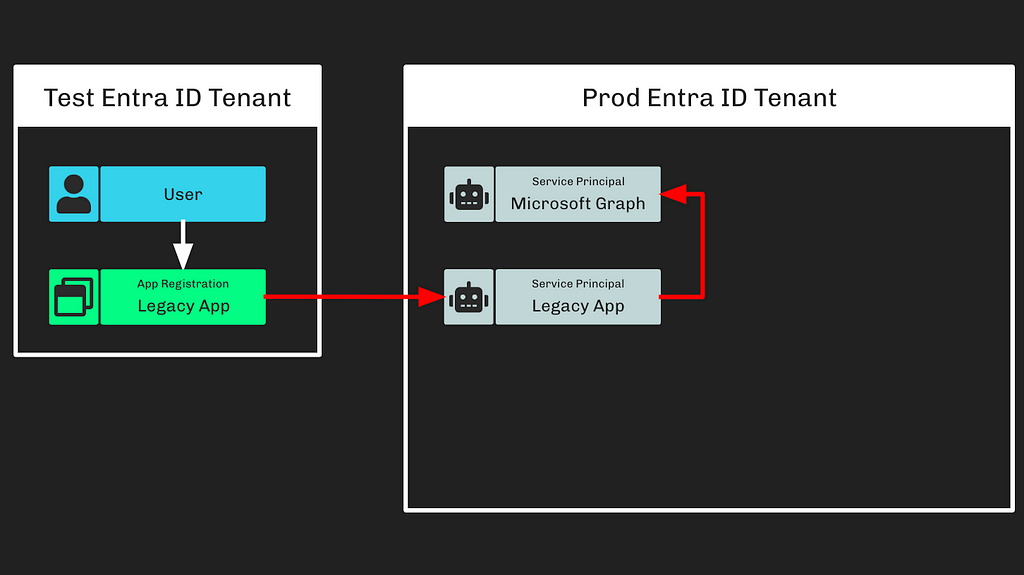
This means that the “legacy” app registration from the test tenant was instantiated as a service principal in the corporate tenant. The privileged actions taken later on led me to believe that this “Legacy App” service principal either had one of the following Entra ID roles:
- Global Administrator
- Partner Tier2 Support
- Privileged Role Administrator
Or one of the following MS Graph app roles:
- AppRoleAssignment.ReadWrite.All
- RoleManagement.ReadWrite.Directory
Whatever the case, the adversary very likely at this point had either Global Administrator rights (or an equivalent) in the Microsoft corporate tenant. I believe the most likely privilege the “Legacy App” service principal had in the Microsoft corporate tenant to be the “AppRoleAssignment.ReadWrite.All” MS Graph app role.
Note: MS Graph app role names and their descriptions can be deceiving. A name like “Directory.ReadWrite.All” sounds much more powerful than it actually is.
Step 3: The adversary created additional app registrations (Figure 3)
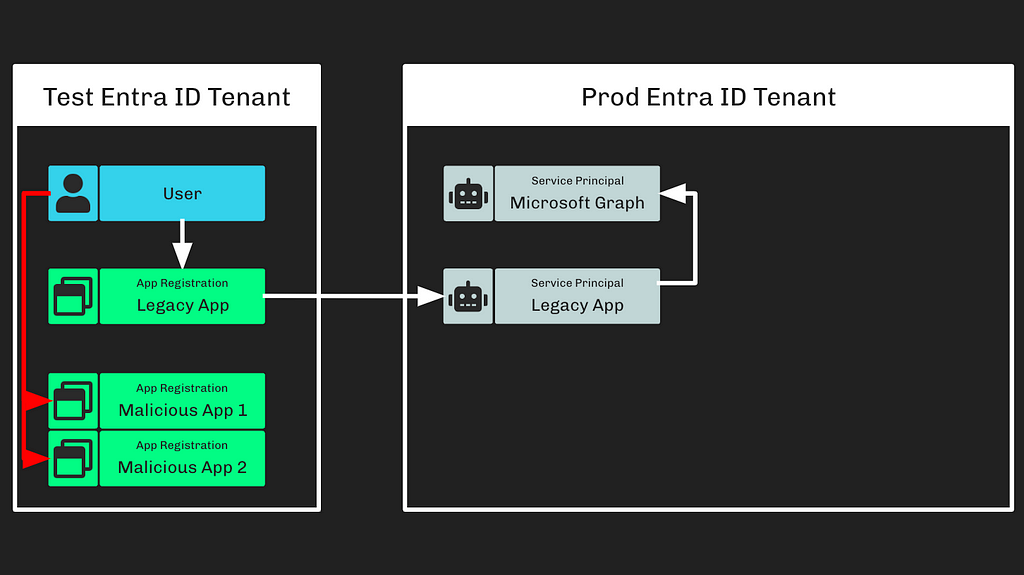
We don’t know if the adversary created these malicious app registrations in the same, initially compromised tenant, or another tenant under the adversary’s control. It doesn’t really matter.
Step 4: The adversary created a new user in the Microsoft corporate tenant (Figure 4).
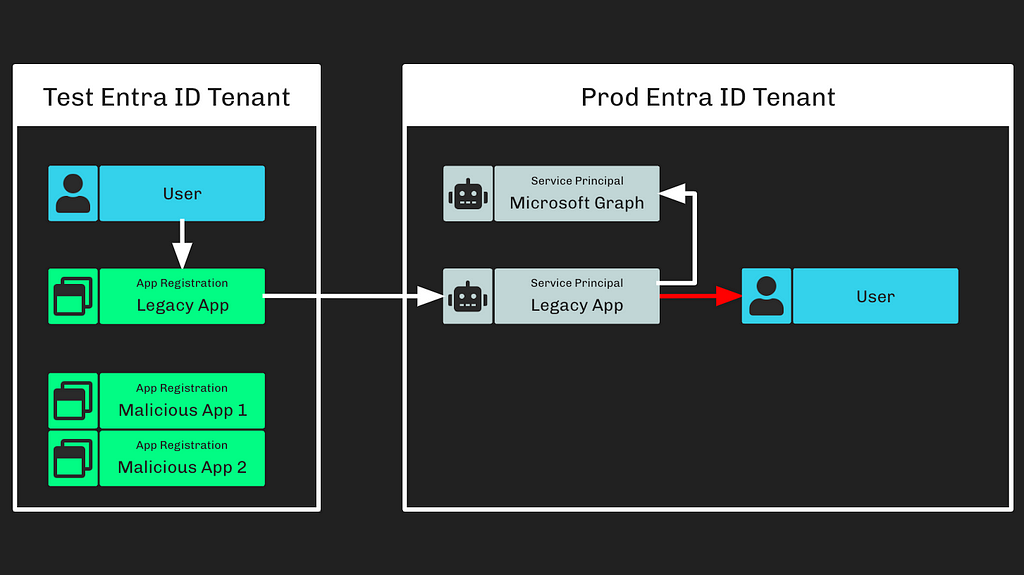
Creating a user requires either one of the following Entra ID admin roles:
- Global Administrator
- Directory Writers
- User Administrator
- Partner Tier1 Support
- Partner Tier2 Support
Or one of the following MS Graph app roles:
- Directory.ReadWrite.All
- User.ReadWrite.All
Again, I believe it is most likely the service principal started with the AppRoleAssignment.ReadWrite.All MS Graph app role. That app role allows the service principal to grant itself any app role and bypass the consent process. Although AppRoleAssignment.ReadWrite.All allows an application to grant itself Directory.ReadWrite.All, the opposite is NOT true. Directory.ReadWrite.All does not enable a service principal to grant itself or any other principal app roles.
Step 5: The adversary used this newly created user to consent to the newly created app registrations (Figure 5).
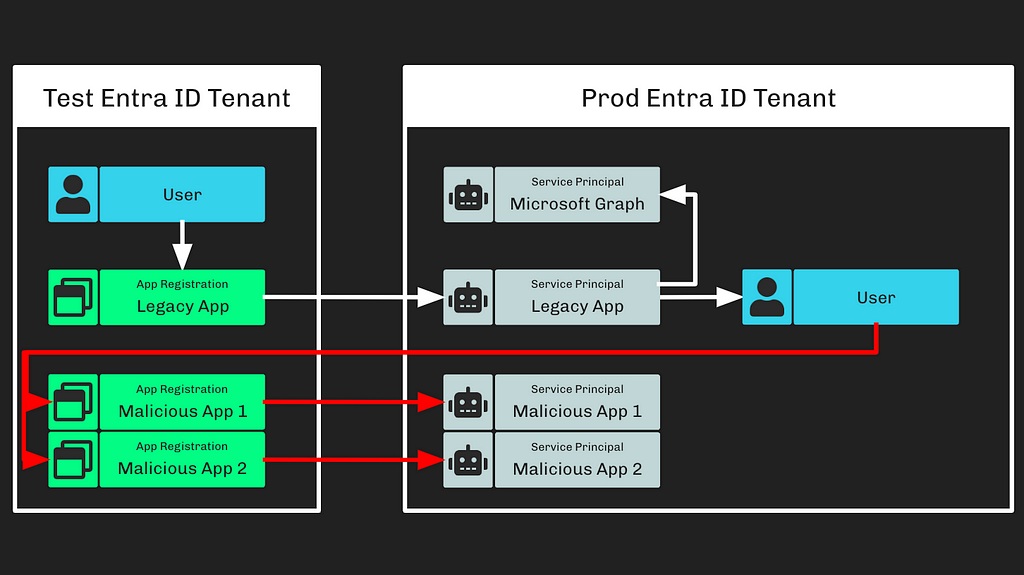
Allowing users to consent to OAuth applications is a fundamental part of the OAuth architecture. This action doesn’t require any special privileges when the app registrations are requesting permissions that do not require admin consent. The end result of this action is that a service principal associated with each app registration is created in the Microsoft corporate tenant.
This allows the attacker to add credentials to their app registrations in the “test” tenant, and then use those credentials to authenticate as the apps’ associated service principals in the “prod” tenant.
Note: Users cannot consent to more privileges than they possess.
Step 6: The adversary granted the “full_access_as_app” EWS app role to the newly created service principals (Figure 6).
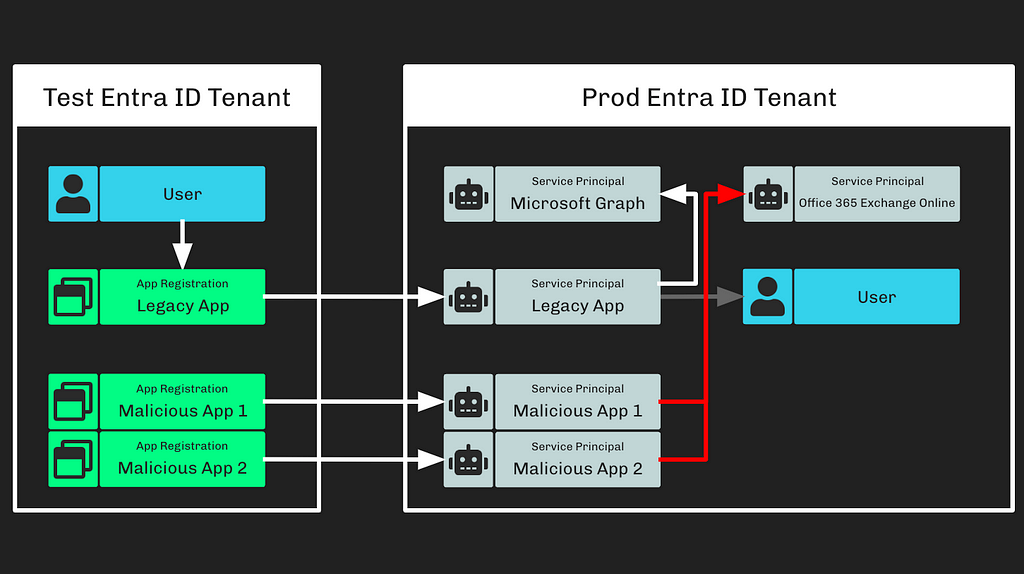
It’s important to carefully read and understand Microsoft’s statement regarding this action:
“The threat actor then used the legacy test OAuth application to grant them the Office 365 Exchange Online full_access_as_app role”
This means that the “Legacy App” service principal granted app roles to other service principals. Performing this action as a service principal requires submitting a POST request to the appRoleAssignedTo MS Graph API endpoint.
Note: Service principals cannot access the consentToApp endpoint in the AAD Graph API.
Accessing this endpoint as a service principal requires the highest privileges that exist in Entra. A service principal can only access this endpoint if it has one of the following Entra ID roles:
- Global Administrator
- Partner Tier2 Support
- Privileged Role Administrator
Or if it has the following MS Graph app role:
- AppRoleAssignment.ReadWrite.All
A service principal can also grant itself any Entra ID role, including Global Administrator, with the following MS Graph app role:
- RoleManagement.ReadWrite.Directory
This means that the adversary not only had the ability to read all Microsoft email inboxes, but the adversary had complete, unmitigated control of the Microsoft corporate tenant.
Step 7: The adversary used these new permissions to access Microsoft employee email inboxes (Figure 7).
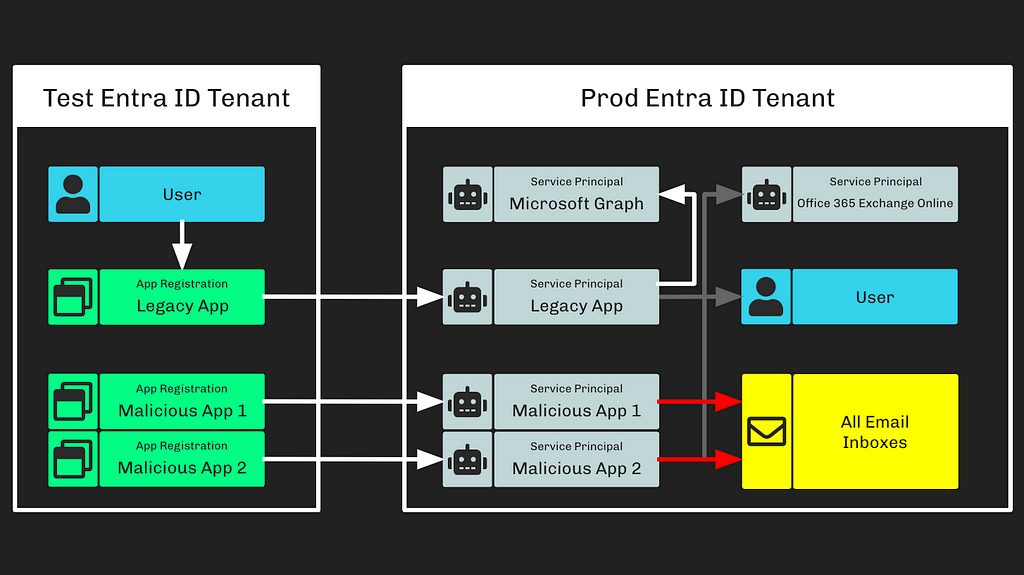
At this point, the adversary has any-time access to all Microsoft employee email inboxes through the malicious OAuth applications and the “full_access_as_app” app role granted to their associated service principals.
What Should Azure Admins Do?
There are a lot of moving pieces to this attack path and, as such, determining where to start can be difficult. I recommend Azure admins take the following steps to protect their environments.
Note: If you are a BloodHound CE or BloodHound Enterprise user, please see this blog post from Stephen Hinck for guidance:
Microsoft Breach — How Can I See This In BloodHound?
Identify Privileged Foreign Applications
The most crucial part of the attack path I want you to focus on is “Step 2” (Figure 8).
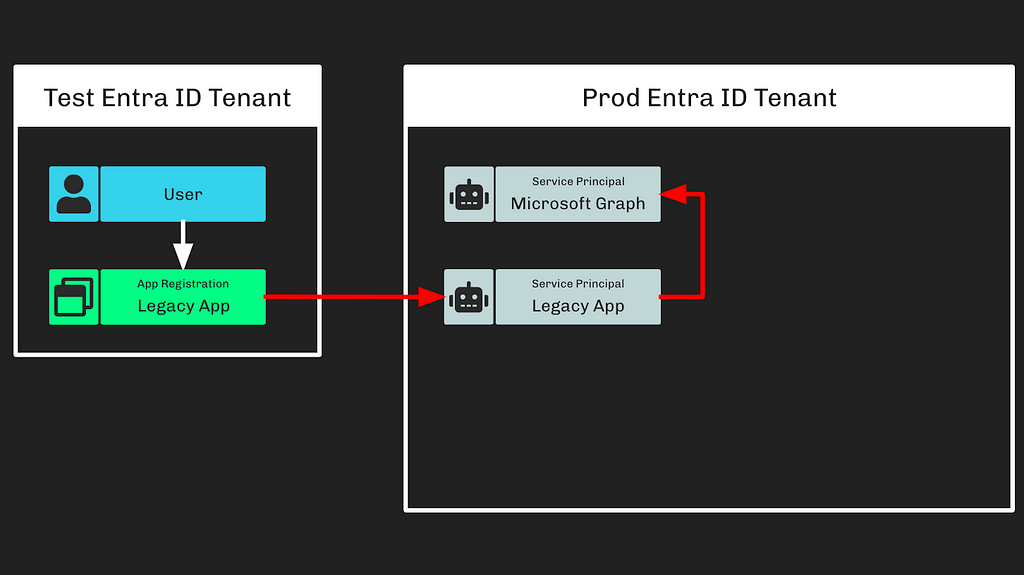
This represents a foreign application with privileges in your environment. Remember that credentials stored on foreign app registrations are valid for authenticating as their associated service principals in your tenant.
I recommend identifying service principals with MS Graph app roles first. You can do that using the Azure portal without any special licenses:
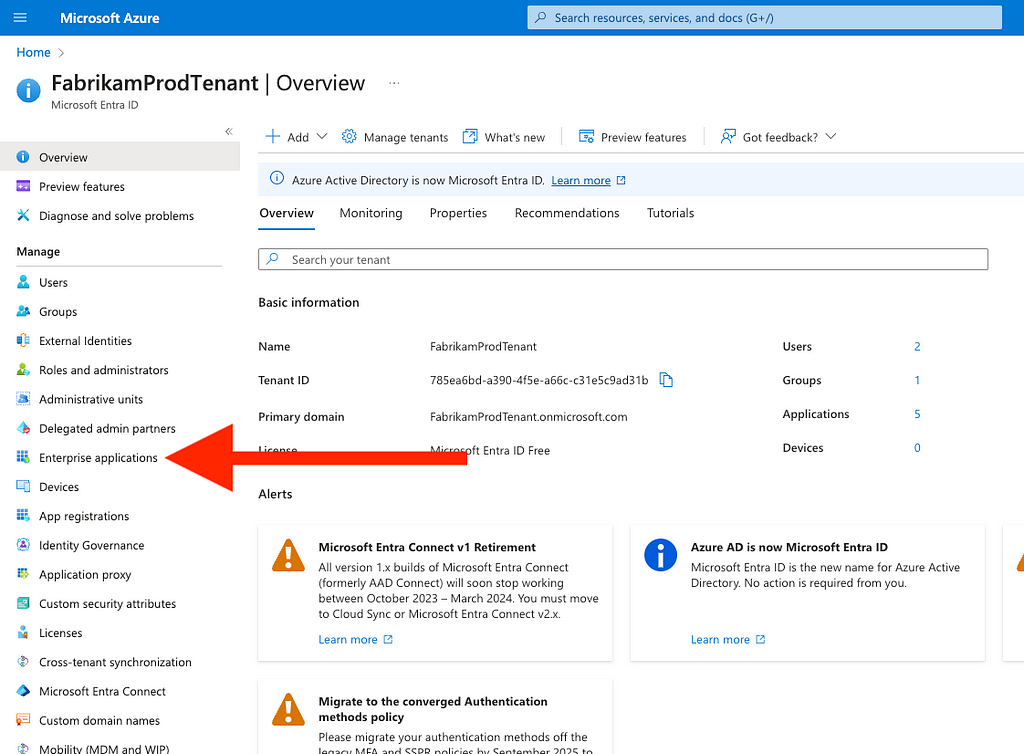
- Open the Azure portal, navigate to your Entra ID tenant, and click on “Enterprise Applications” (Figure 9)
2. Click the “X” on each filter to clear the default filters (Figure 10)
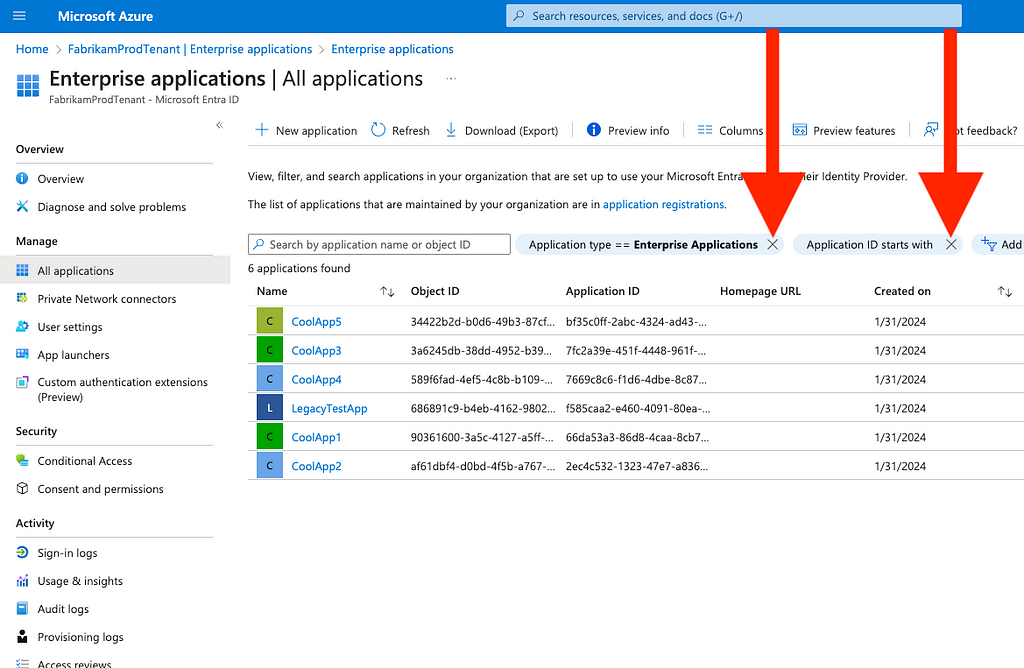
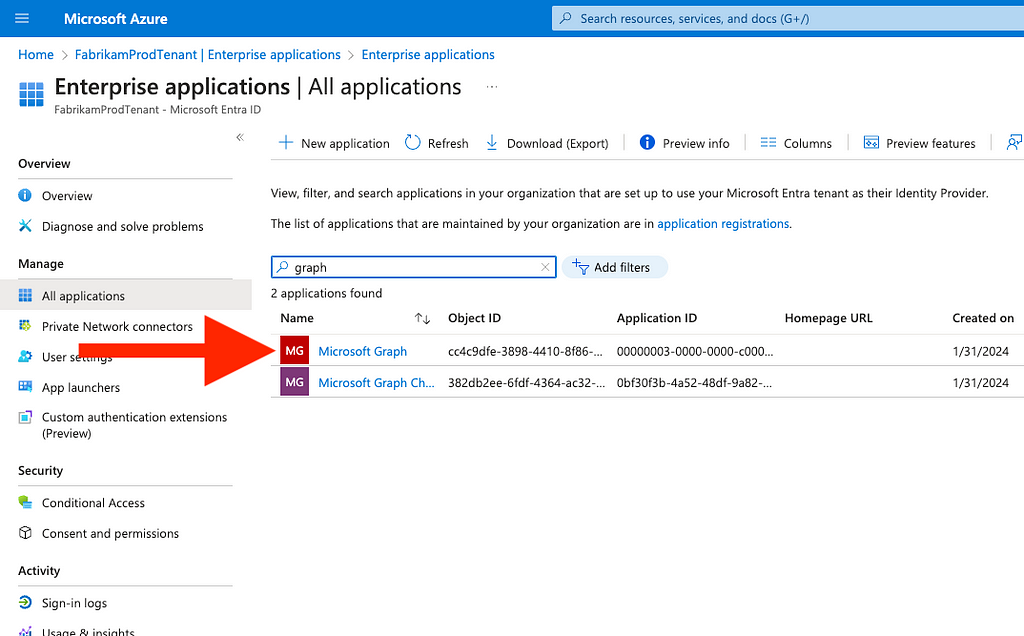
3. Type the word “graph” into the search bar
4. Identify the result where the “Application ID” field matches “00000003–0000–0000-c000–000000000000”
5. Click on the name, which may be “Microsoft Graph”, “Graph Aggregator Service”, or something else (Figure 11)
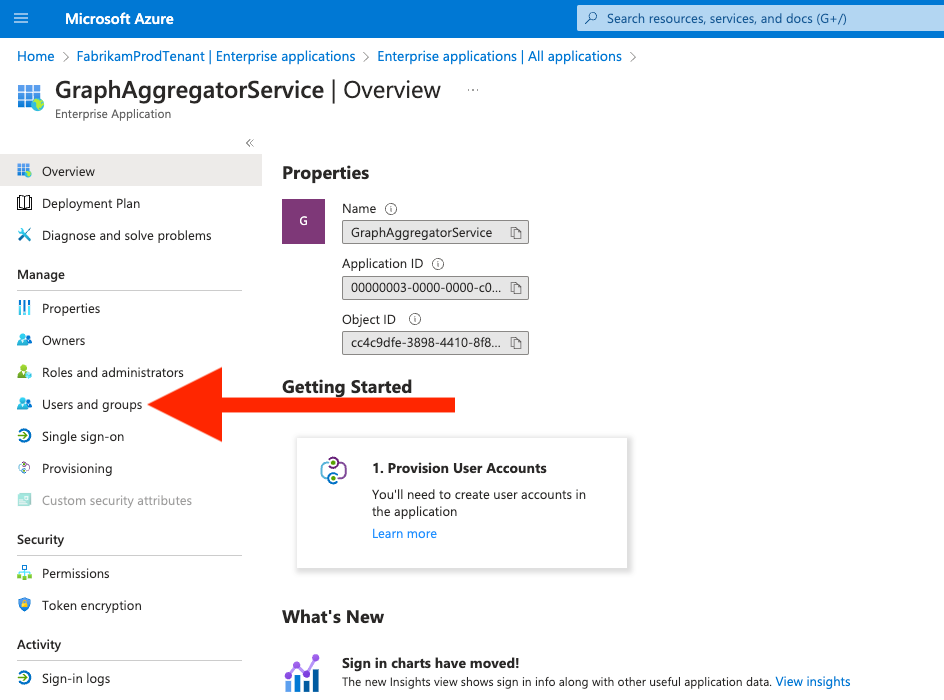
6. Click on “Users and groups” (Figure 12)
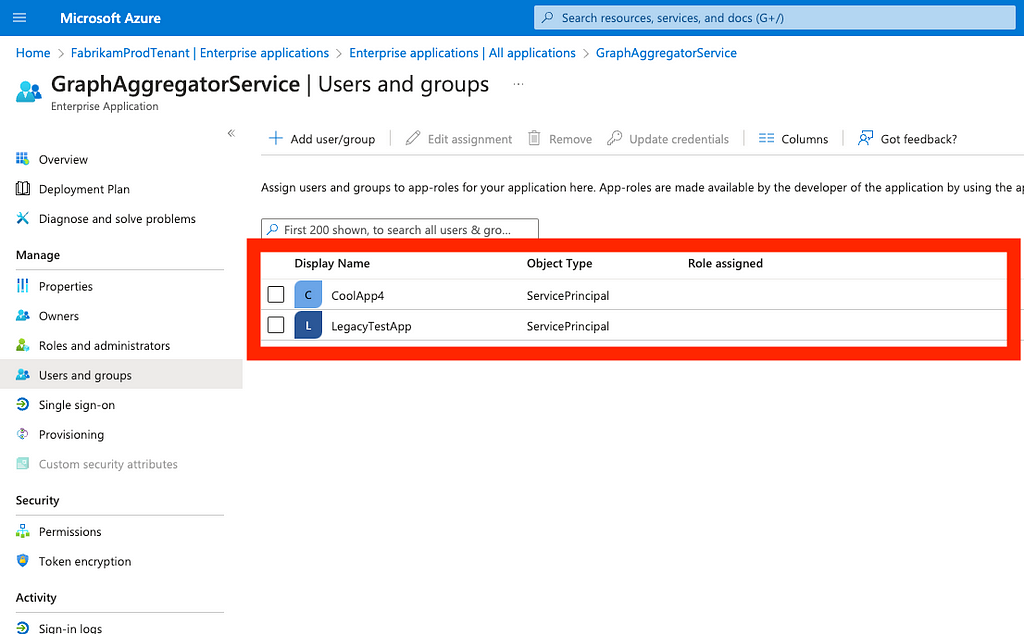
7. This view shows you service principals that have MS Graph app roles; however, the graphical user interface (GUI) does not tell you the name of the assigned role (Figure 13)
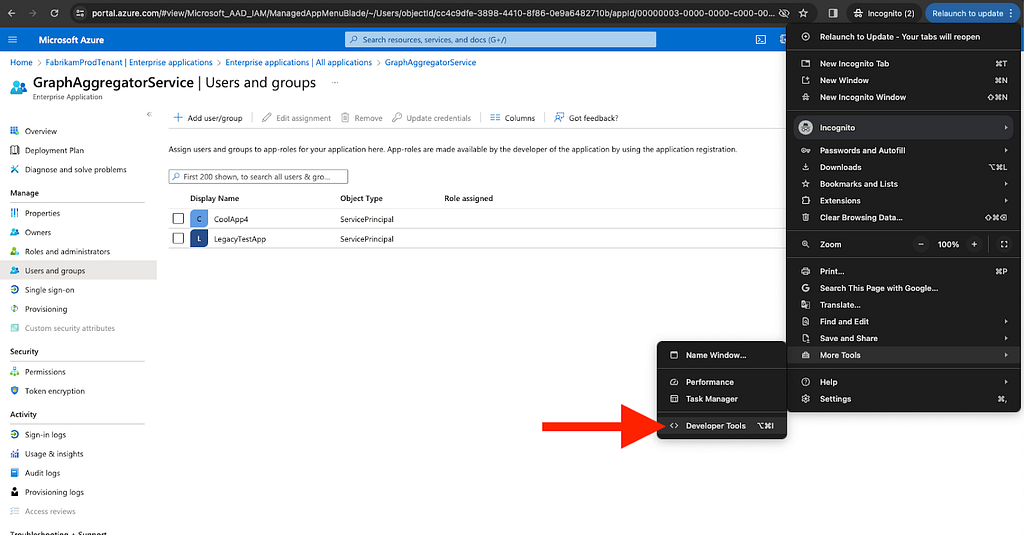
8. To see what role has been granted, you will need to open your browser’s developer tools; to do this in Chrome, click the three-button menu, navigate to “More Tools”, and then select “Developer Tools” (Figure 14)
9. Navigate away from this page and then back to it, for example by clicking on “Roles and administrators”, then clicking again on “Users and groups”
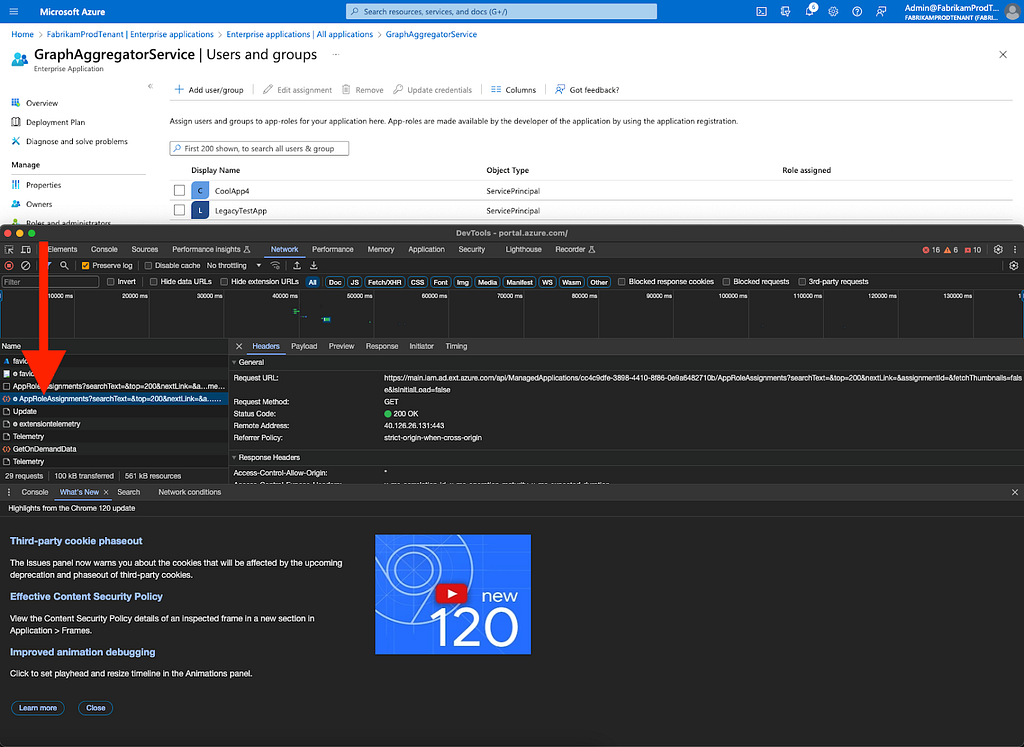
10. Find and click on the “GET” request that was made to “AppRoleAssignments” (Figure 15):
11. Click on “Response” (Figure 16)
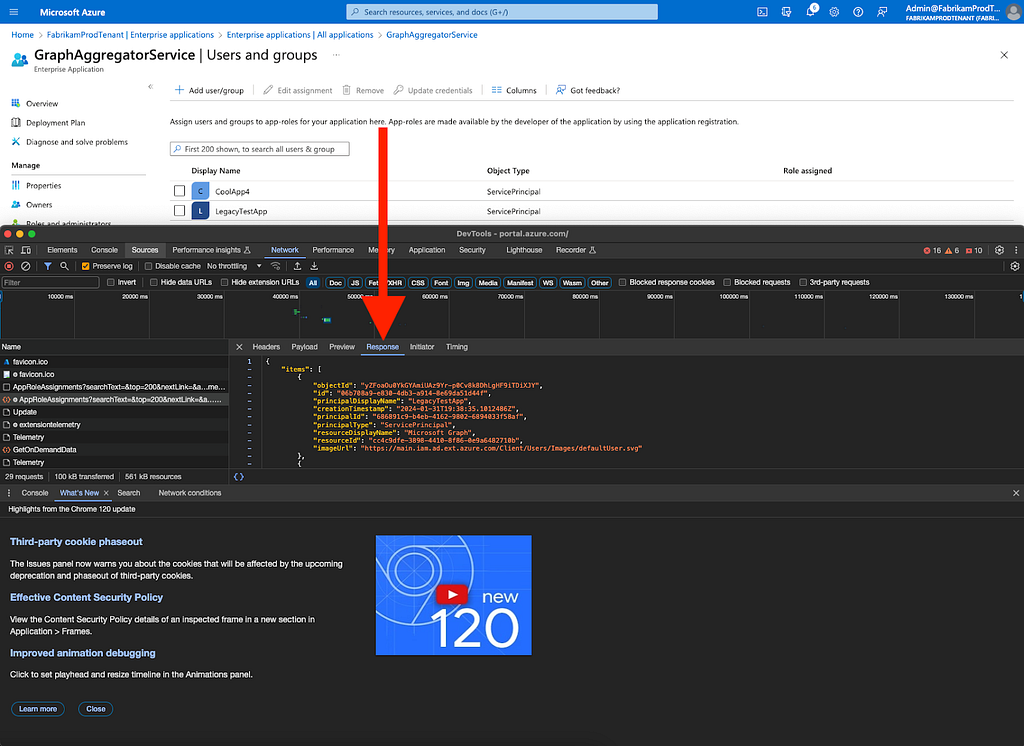
12. Copy the response payload and paste it into a text editor. Search for the following strings:
1bfefb4e-e0b5–418b-a88f-73c46d2cc8e9
06b708a9-e830–4db3-a914–8e69da51d44f
19dbc75e-c2e2–444c-a770-ec69d8559fc7
62a82d76–70ea-41e2–9197–370581804d09
dbaae8cf-10b5–4b86-a4a1-f871c94c6695
9e3f62cf-ca93–4989-b6ce-bf83c28f9fe8
89c8469c-83ad-45f7–8ff2–6e3d4285709e
13. The above globally unique identifiers (GUIDs) correspond the following dangerous MS Graph app roles:
- 1bfefb4e-e0b5–418b-a88f-73c46d2cc8e9 — Application.ReadWrite.All
- 06b708a9-e830–4db3-a914–8e69da51d44f — AppRoleAssignment.ReadWrite.All
- 19dbc75e-c2e2–444c-a770-ec69d8559fc7 — Directory.ReadWrite.All
- 62a82d76–70ea-41e2–9197–370581804d09 — Group.ReadWrite.All
- Dbaae8cf-10b5–4b86-a4a1-f871c94c6695 — GroupMember.ReadWrite.All
- 9e3f62cf-ca93–4989-b6ce-bf83c28f9fe8 — RoleManagement.ReadWrite.Directory
- 89c8469c-83ad-45f7–8ff2–6e3d4285709e — ServicePrincipalEndpoint.ReadWrite.All
14. To better understand the impact of those app roles, this table shows which dangerous, privileged actions each app role enables (Figure 17)
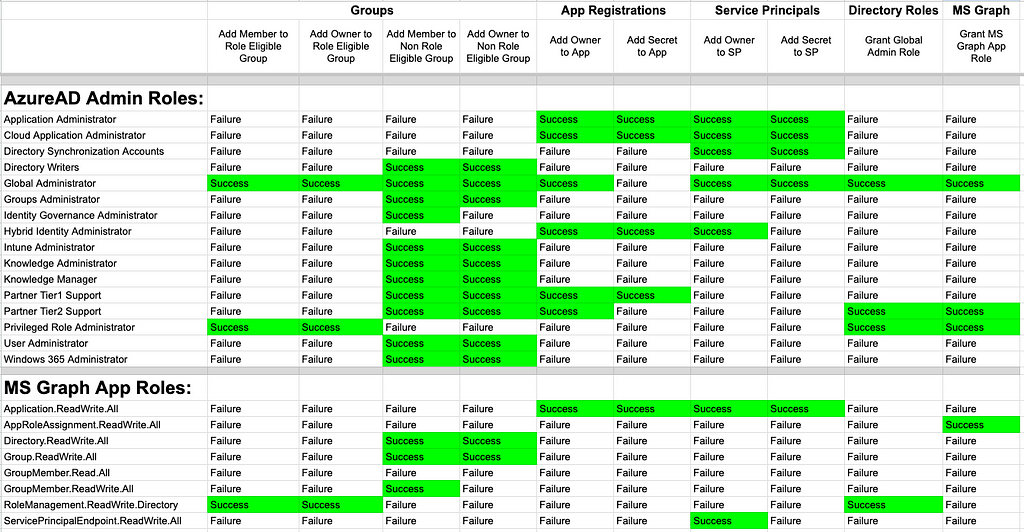
15. The most dangerous MS Graph app roles are RoleManagement.ReadWrite.Directory and AppRoleAssignment.ReadWrite.All; if you identify a service principal with either of those app roles, you have identified a service principal that has the equivalent of Global Administrator in your tenant
16. For each service principal you identify, navigate to them using the Azure portal GUI (for example, I identified an app in my tenant called “LegacyTestApp”)
17. Go back to the “Enterprise applications” page and search for the service principal by name, then click its name (Figure 18)
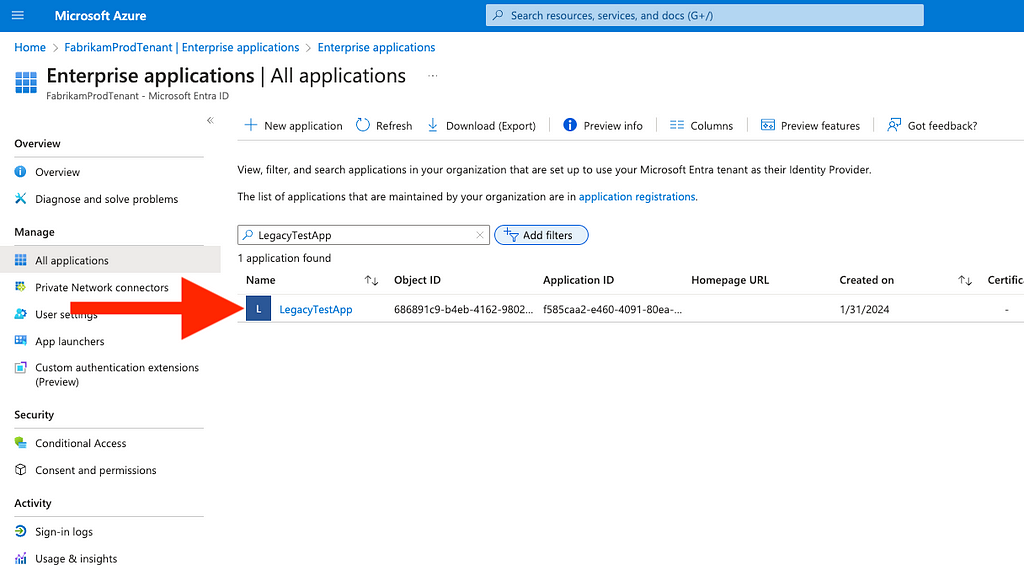
18. The Azure GUI will not show you the tenant ID of the service principal; open your browser developer tools again and click on “Roles and administrators”, then find and click on the GET request to “getByIds”, and click on “Response” (Figure 19)
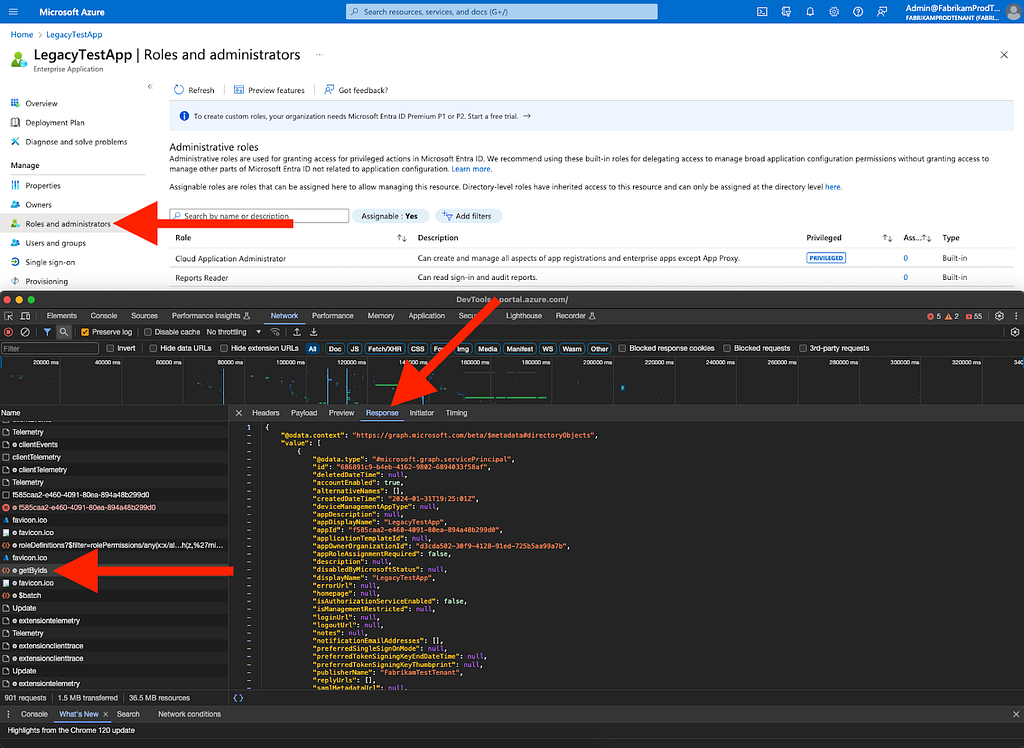
19. In this response, look for a field called “appOwnerOrganizationId”; navigate to your tenant overview and compare that value to your own Entra ID tenant ID (Figure 20)
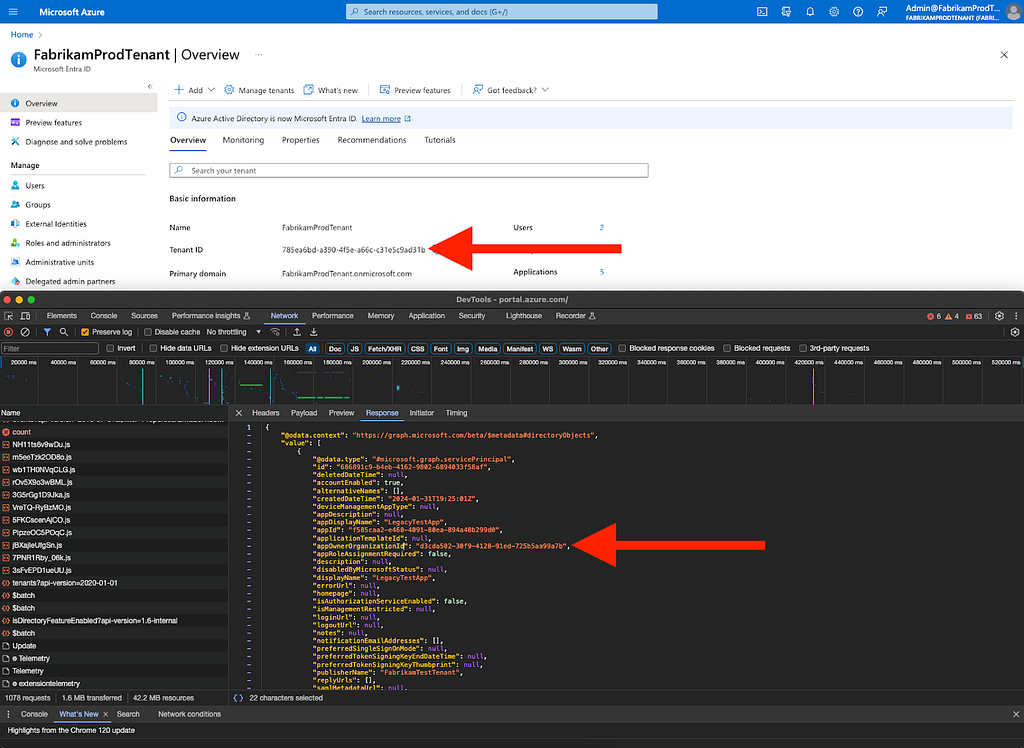
20. If those values are different, you have identified a privileged foreign application in your tenant and at this point, you should determine the exact nature of this application
- It may be a legitimate application that performs privileged actions in your tenant; for example, Okta and Quest have applications that make legitimate use of these privileges
- If it is not a legitimate application, you should remove its privileges immediately
Obviously, this process is not easily repeatable. You can automate this process quite easily by taking the following steps:
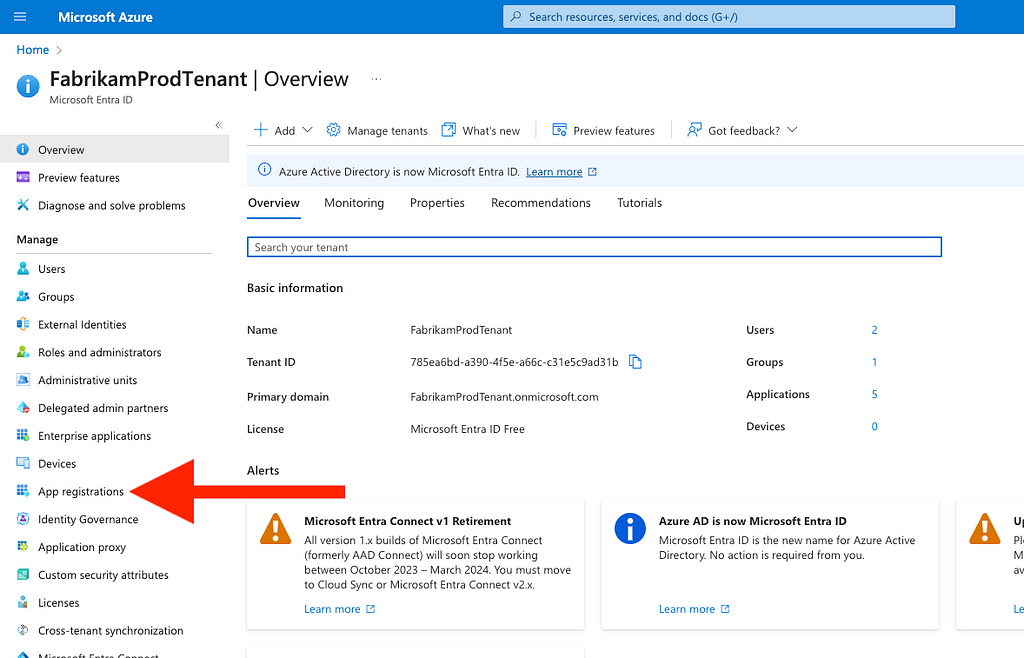
- From your tenant overview, click “App registrations” (Figure 21)
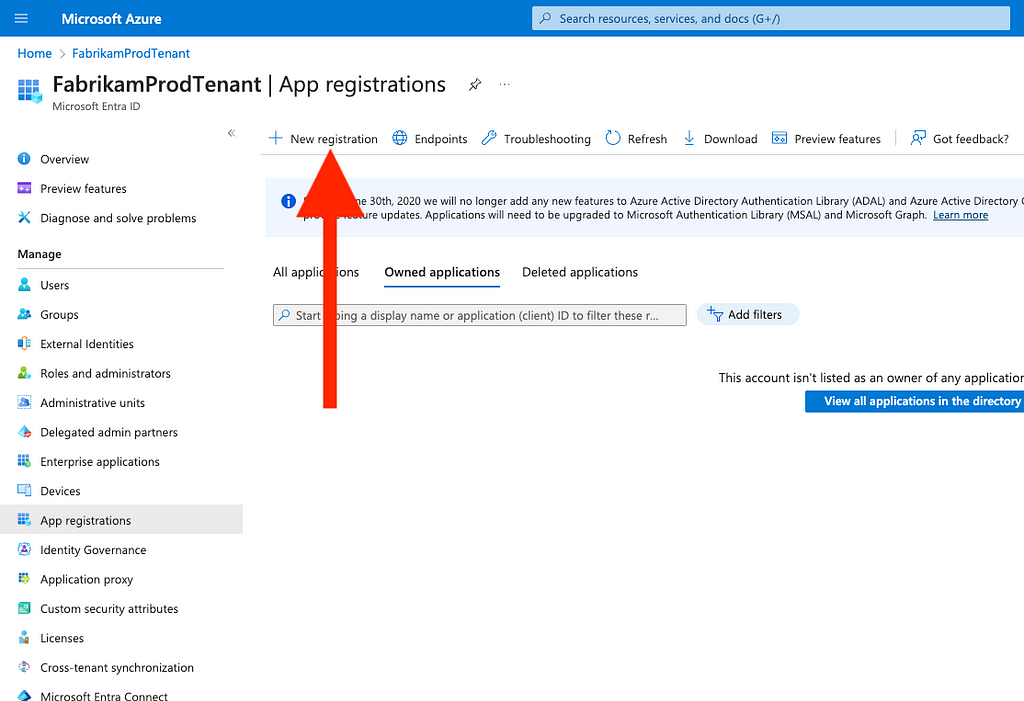
2. Click “New registration” (Figure 22)
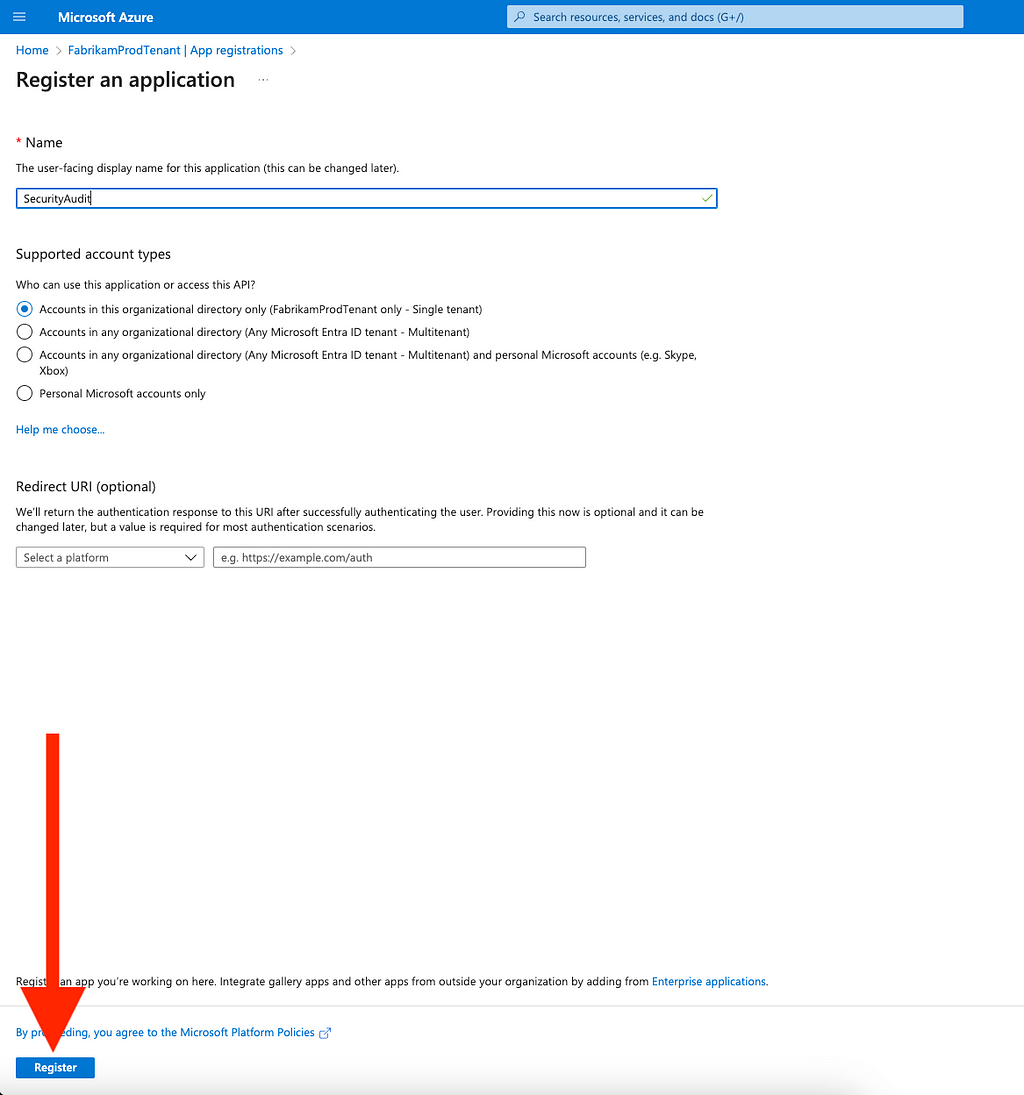
3. Enter a name for your new app (for example, you might call it “SecurityAudit”) And leave the default radio selection in place; you do not need to enter a redirect URI
4. Click “Register” (Figure 23)
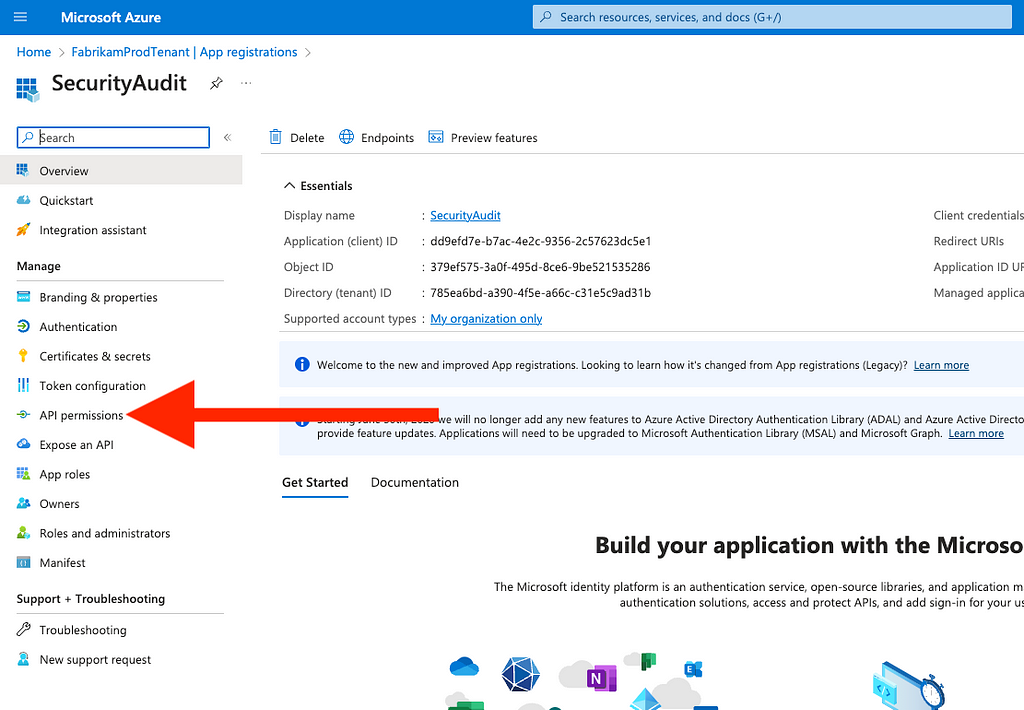
5. You will be automatically taken to the app registration page; from here, click “API Permissions” (Figure 24)
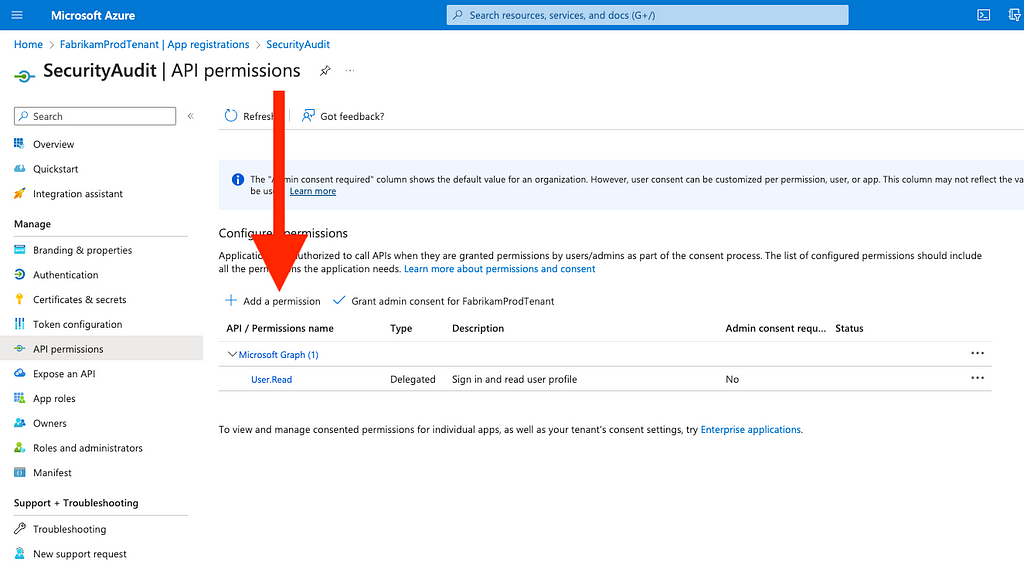
6. Click “Add a permission” (Figure 25)
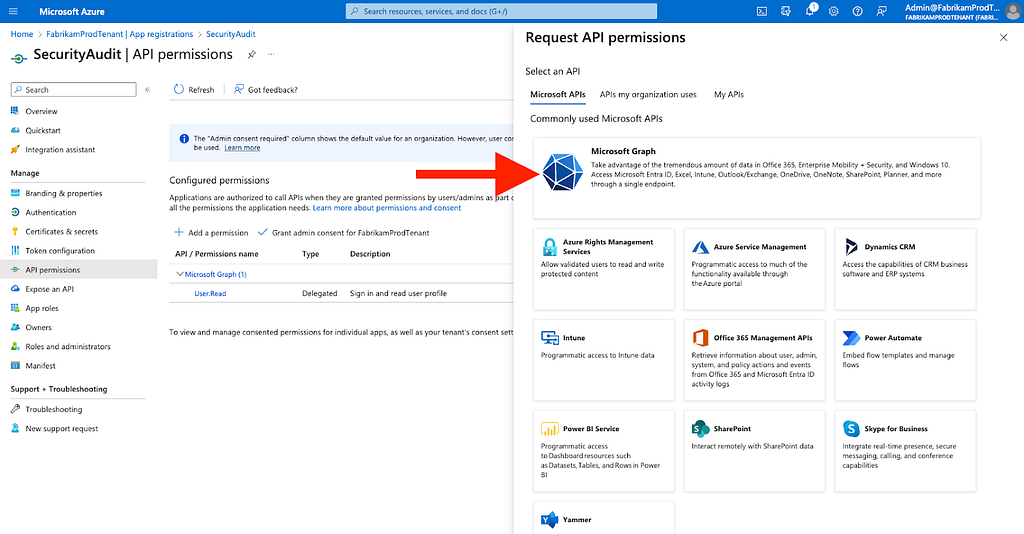
7. Click “Microsoft Graph” (Figure 26)
8. Click “Application permissions” (Figure 27)
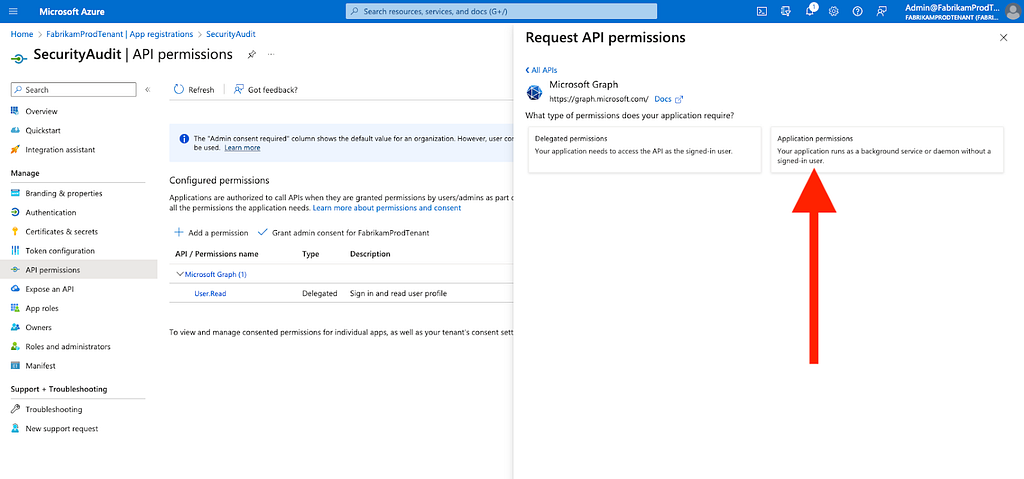
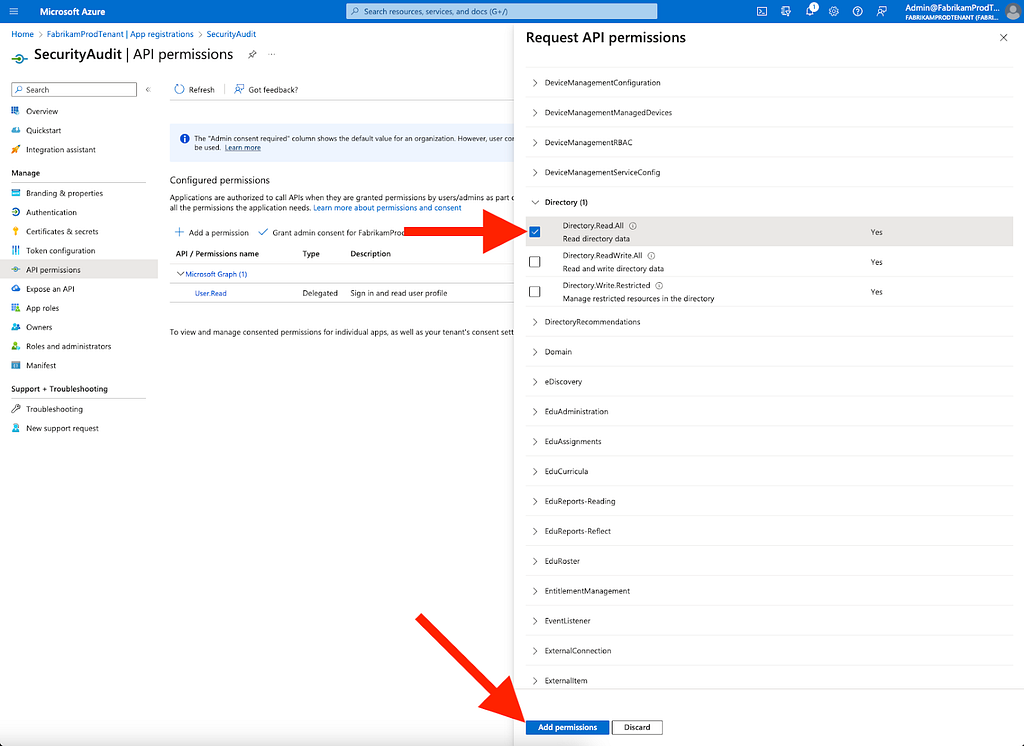
9. Scroll down to and expand “Directory”
10. Check Directory.Read.All
11. Click “Add permissions” (Figure 28)
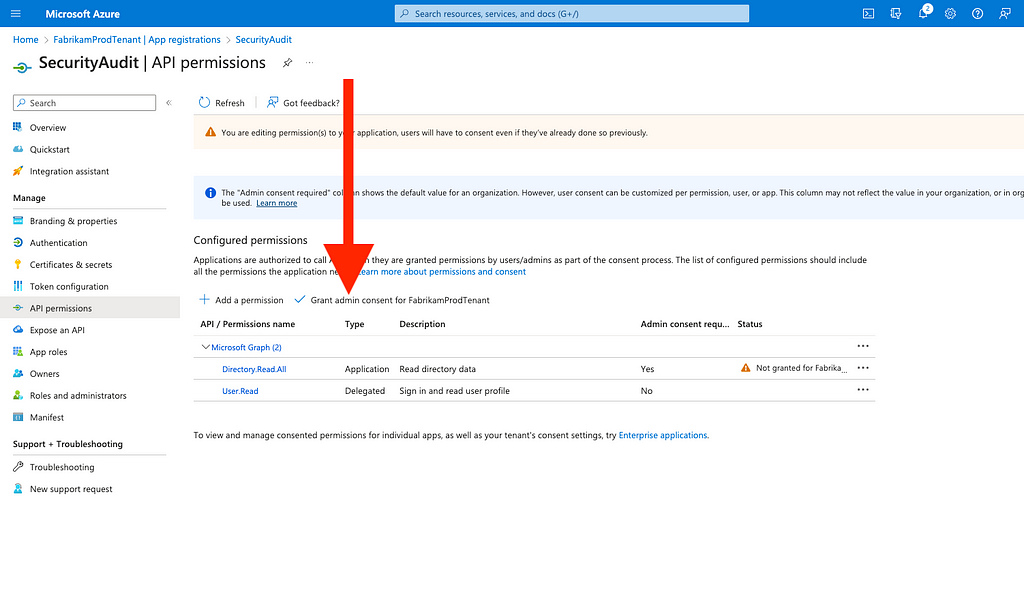
12. Click “Grant admin consent…” (Figure 29)
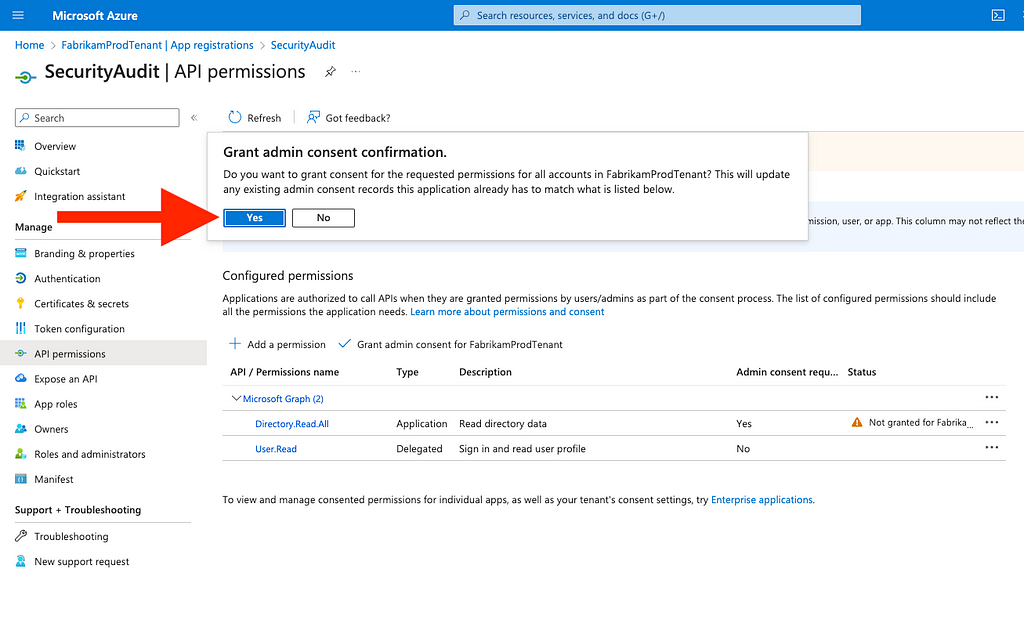
13. Click “Yes” (Figure 30)
14. Click “Certificates & secrets” on the left (Figure 31)
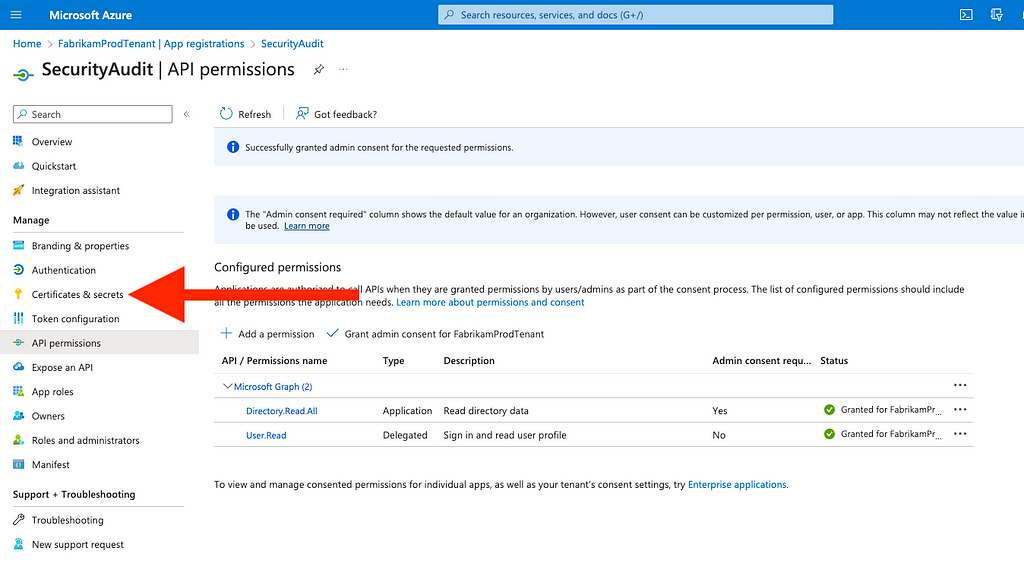
15. Click “New client secret”, provide a description, specify an expiration, and then click “Add” (Figure 32)
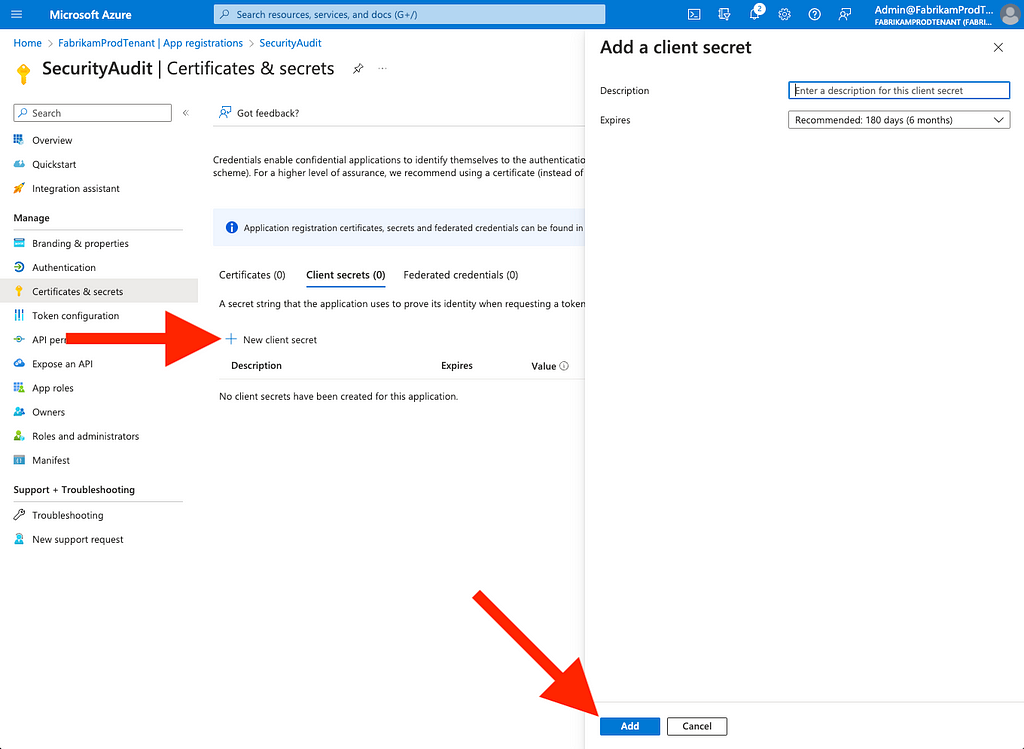
16. Copy the plaintext secret, as it will not be shown again and cannot be retrieved (Figure 33)
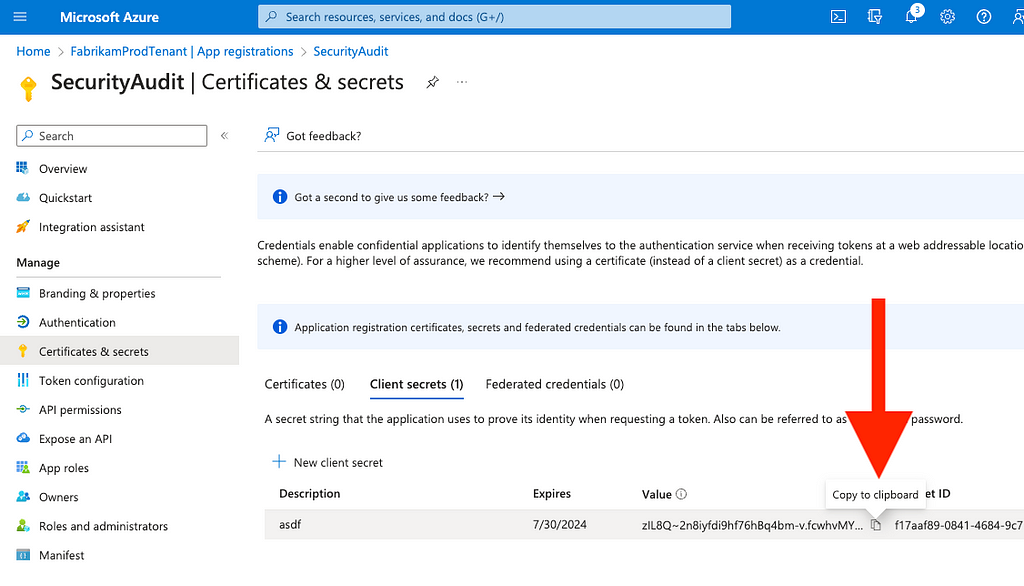
17. Paste this secret somewhere
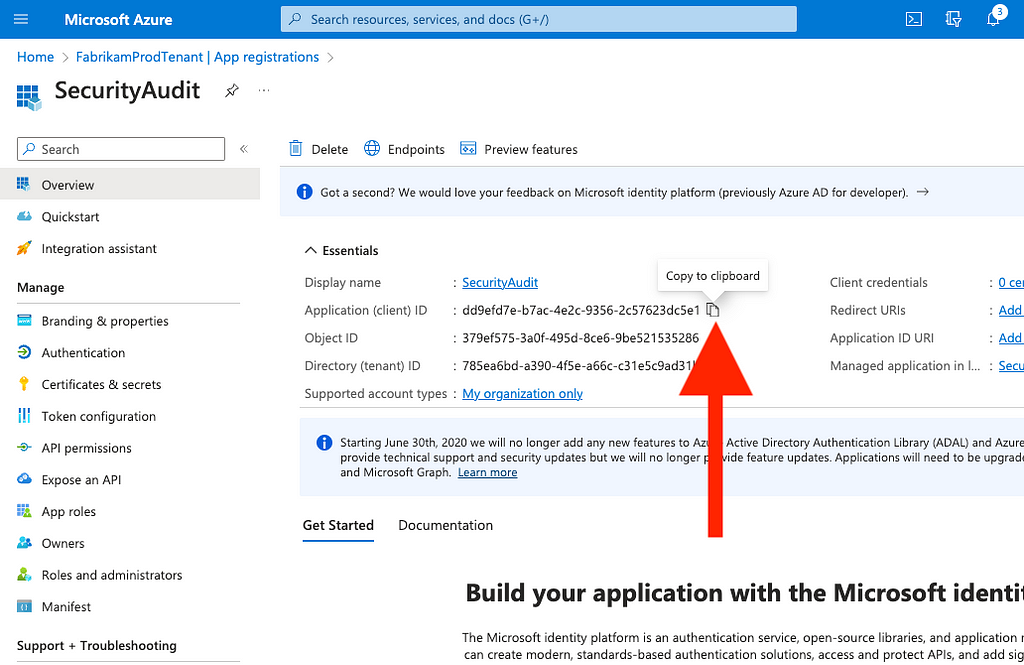
18. Go to the app’s “Overview” page and copy the value for “Application (client) ID” (Figure 34)
Now that you have your application client ID and secret, you can run scripts that will allow you to easily automate the tedious audit process we went through in the GUI above.
We have functions in BARK that you can use to build your own script. Here is what I recommend you do:
Use BARK’s Get-MSGraphTokenWithClientCredentials function to get an MS Graph-scoped token as your “SecurityAudit” app:
$MSGraphToken = (Get-MSGraphTokenWithClientCredentials `
    -ClientID 'dd9efd7e-b7ac-4e2c-9356–2c57623dc5e1' `
    -ClientSecret 'zIL8Q~2n8iyfdi9hf76hBq4bm-v.fcwhvMY0ebVN' `
    -TenantName 'FabrikamProdTenant.onmicrosoft.com').access_token
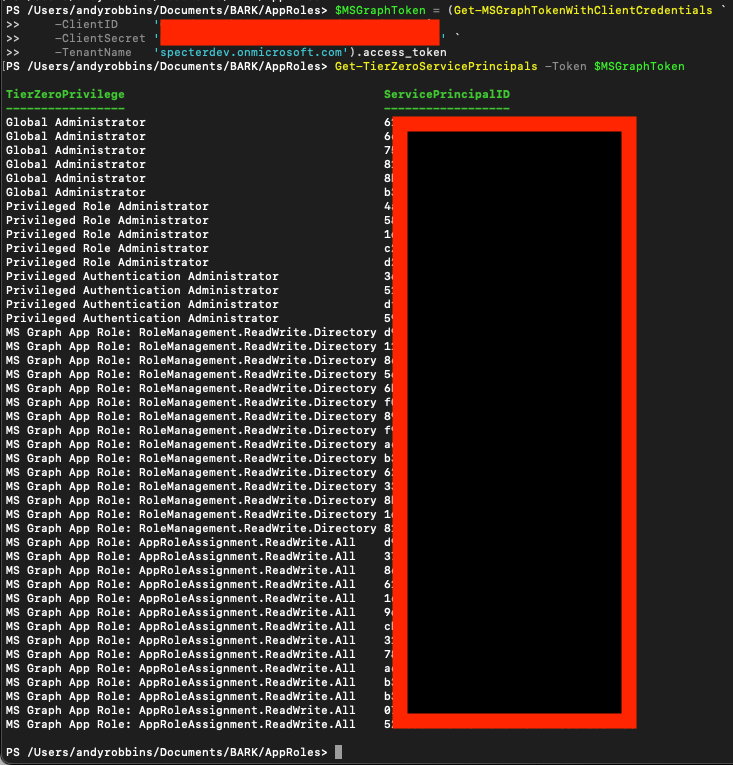
Use BARK’s Get-TierZeroServicePrincipals function to retrieve all service principals that have the highest privilege Entra ID roles and MS Graph app roles:
Get-TierZeroServicePrincipals -Token $MSGraphToken
Here’s an example of what the output looks like when I run that command in our research environment (Figure 35):
To identify foreign security principals, pipe the output of that command to BARK’s Get-AzureADServicePrincipal and show only the service principal ID, display name, and app owner organization (tenant) ID:
Get-TierZeroServicePrincipals -Token $MSGraphToken | Select ServicePrincipalID | Sort-Object -Unique -Property ServicePrincipalID | %{
    Get-AzureADServicePrincipal `
        -Token $MSGraphToken `
        -ObjectID $_.ServicePrincipalID | Select id,appDisplayName,appOwnerOrganizationId
}
Here is an example of this running against our research tenant (Figure 36):
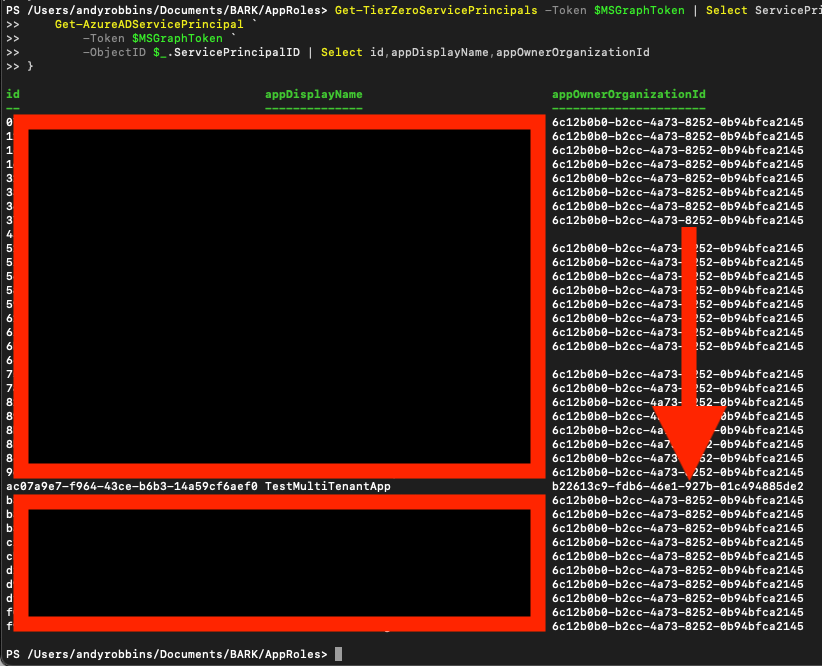
Notice that there is an outlier where the “appOwnerOrganizationId” value is not the same as it is for the other service principals. This means we’ve identified a foreign application with dangerous permissions in our tenant.
Some lines have a null value of appOwnerOrganizationId because those service principals are managed identities. You may see the same thing.
Conclusion
Azure admins should take the Microsoft breach as a very real, very impactful example of what can happen when attack paths go unresolved, especially when those attack paths traverse trust boundaries. Azure admins can find such attack paths using free and open source tools like BARK, BloodHound CE, or ROADtools.
Microsoft Breach — What Happened? What Should Azure Admins Do? was originally published in Posts By SpecterOps Team Members on Medium, where people are continuing the conversation by highlighting and responding to this story.
*** This is a Security Bloggers Network syndicated blog from Posts By SpecterOps Team Members – Medium authored by Andy Robbins. Read the original post at: https://posts.specterops.io/microsoft-breach-what-happened-what-should-azure-admins-do-da2b7e674ebc?source=rss—-f05f8696e3cc—4
Original Post URL: https://securityboulevard.com/2024/02/microsoft-breach-what-happened-what-should-azure-admins-do/
Category & Tags: Cloud Security,SBN News,Security Bloggers Network,azure,cloud computing,Cybersecurity,information-technology,Microsoft – Cloud Security,SBN News,Security Bloggers Network,azure,cloud computing,Cybersecurity,information-technology,Microsoft
Views: 1

